So I know that one of Fords electronic actuators is out, so, time to do some exploratory surgery and see whats knocking in the back!
Do this on a Cold Motor, because there are heater hoses running to the back and you could injure yourself on the hot hoses.
- First off, You'll need:
- A Socket Set, Metric 3/8 and 1/4" drives with various extensions. Specifically, 13mm deep, 10mm and 8mm.
- A trim removal tool
- A dropcloth or sheet to keep the interior of your truck clean
- T50 Torx Driver
So here's our 2002 Ford Explorer. Start by Putting down the rear seat if equipped and removing any cargo tray liners, tools, junk etc from the rear of the truck.
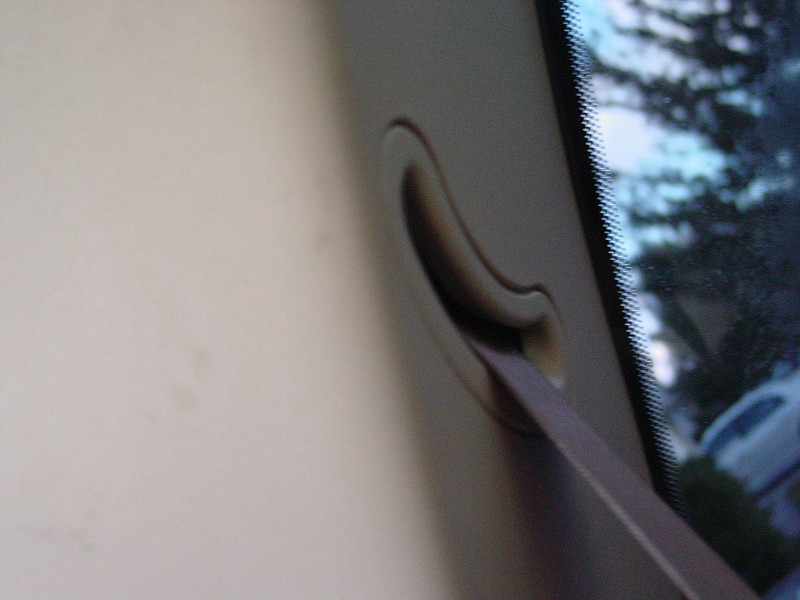
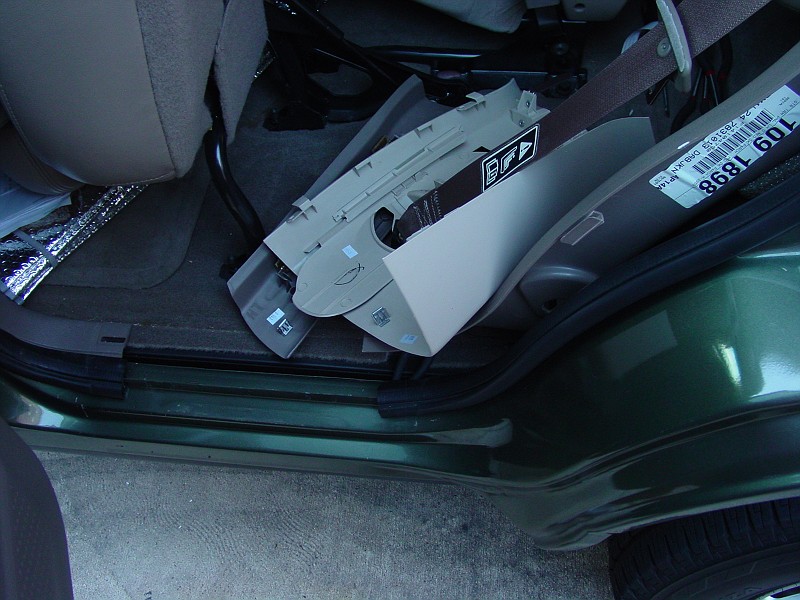
First, remove the upper and lower trim from around the cargo area. This can be achieved by using your fingers to gently pry out the panels or you can use the trim removal tool to help.
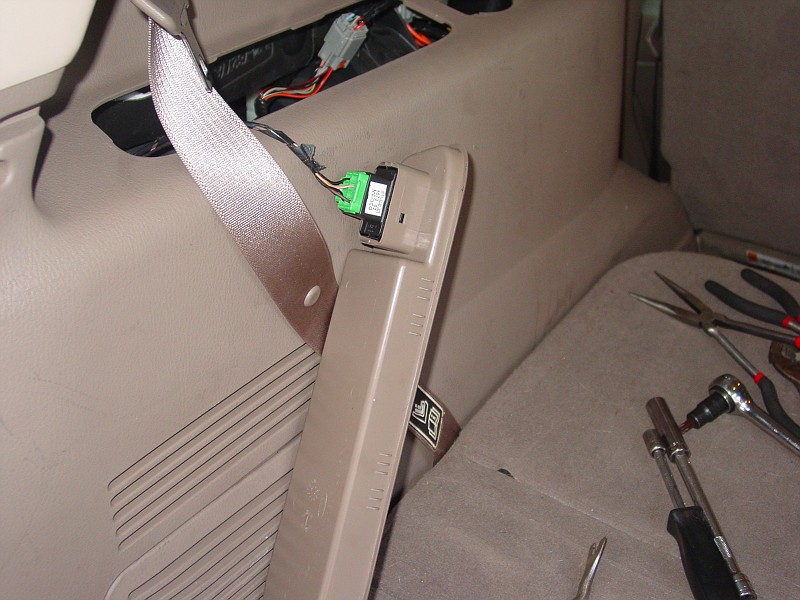
Next, if equipped, pull the 3rd row Seat Belt "D" ring out of the panel
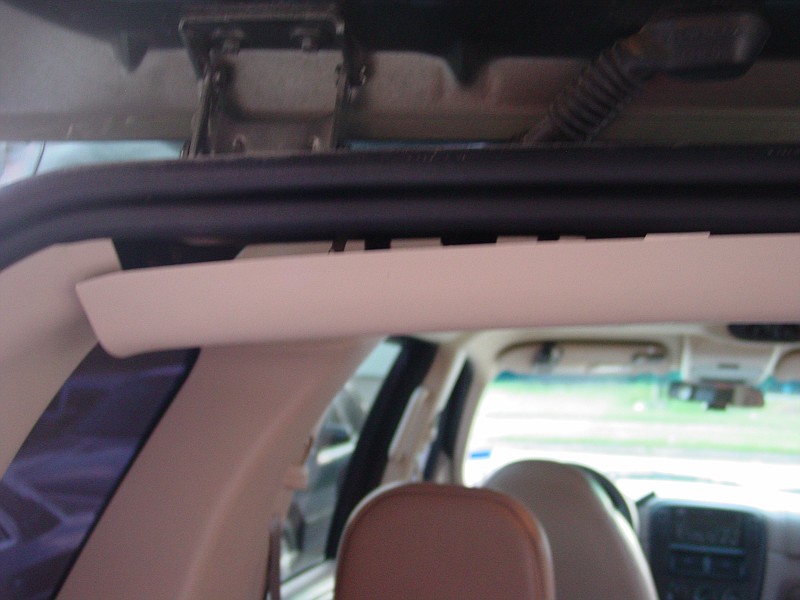
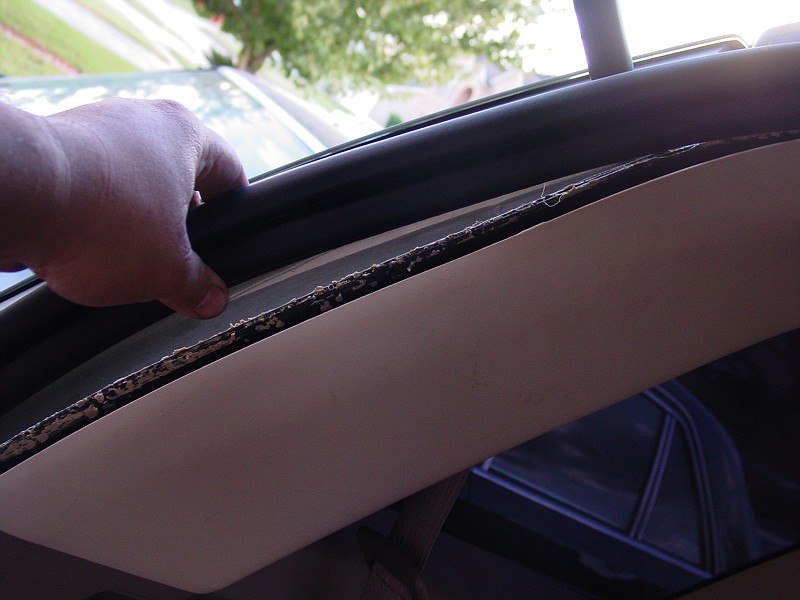
Now that the D Ring is out of the way, pull the rear hatch weather stripping out of the way and remove the Upper Side trim panel. Use your trim removal tool to help in getting the panel loose. Gently pry AT the clips and pull out. Once one side is loose, pull at the clips, not at the whole panel.
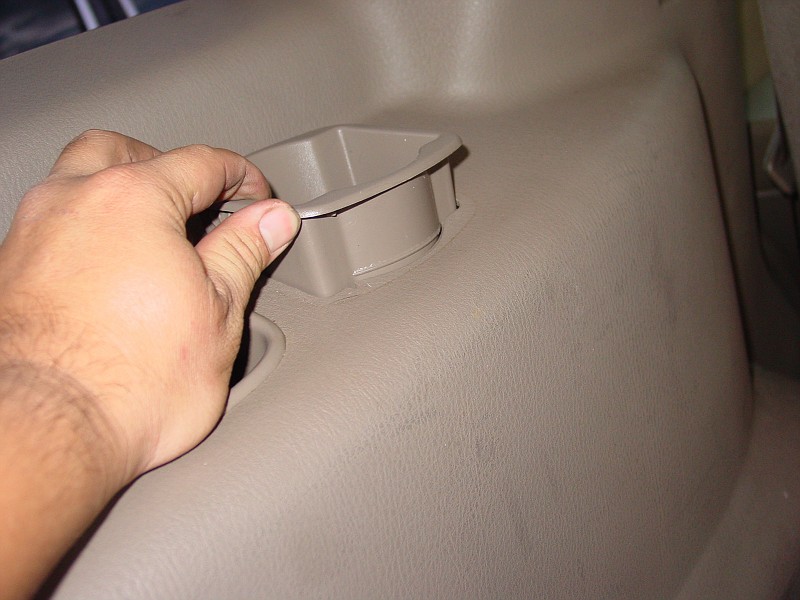
Now that the panel is exposed, we can remove the cupholder and the power lock panel, disconnect the wiring harness to the switch. Use the trim tool to help avoid scratching your interior.
Now that we have this panel removed you're going to need to get to the driver side rear door and remove the upper trim piece, lower scuff plate and lower seat belt anchor. The upper trim panel is VERY tricky. Be gentle and take your time.
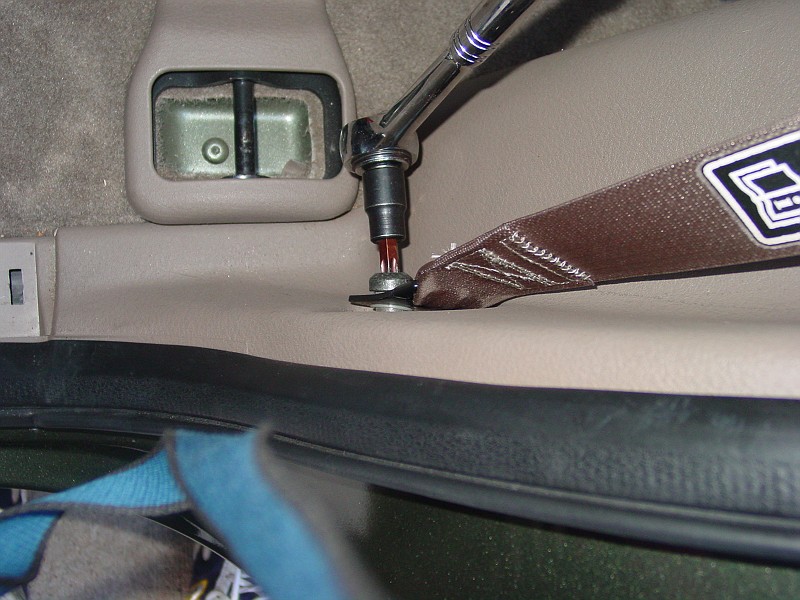
Now that the scuff plate and upper panel is removed, pull outwards on the lower panel from the front, and then go to the rear, pull out again, near the clips, use your trim tool to help.
Now move to the back. This duct can be pushed up into the upper duct so you can remove the blower box.
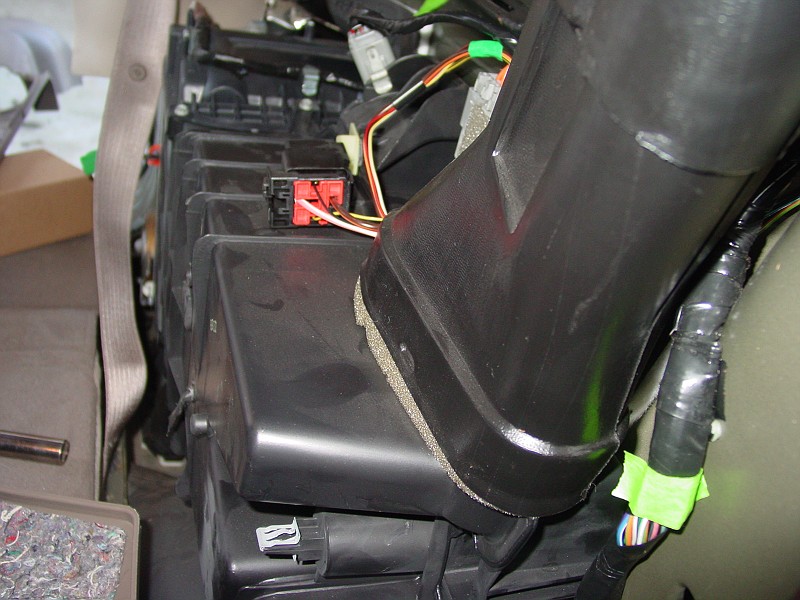
Now, you can remove the upper 10mm bolt on the blower housing
 Now loosen the lower bolt near the driver side rear door, 13 mm. You'll need a deep well 13 mm to access this.
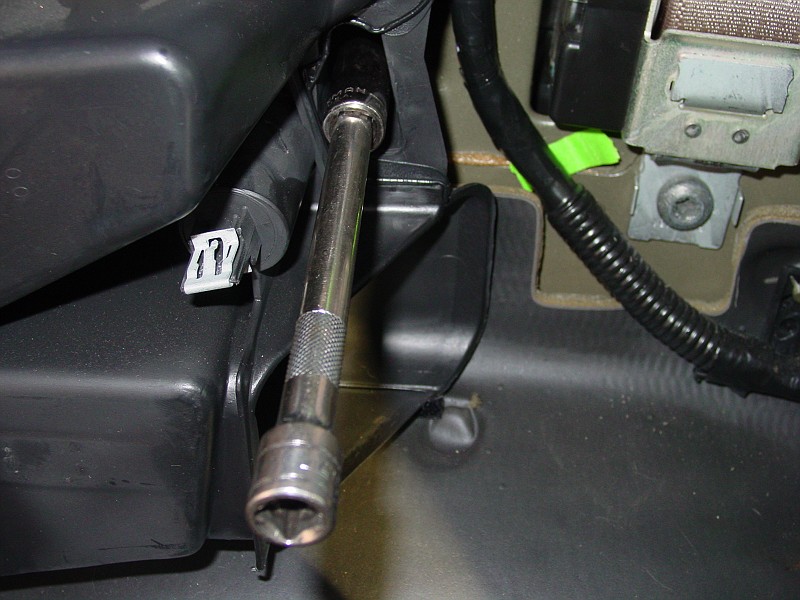
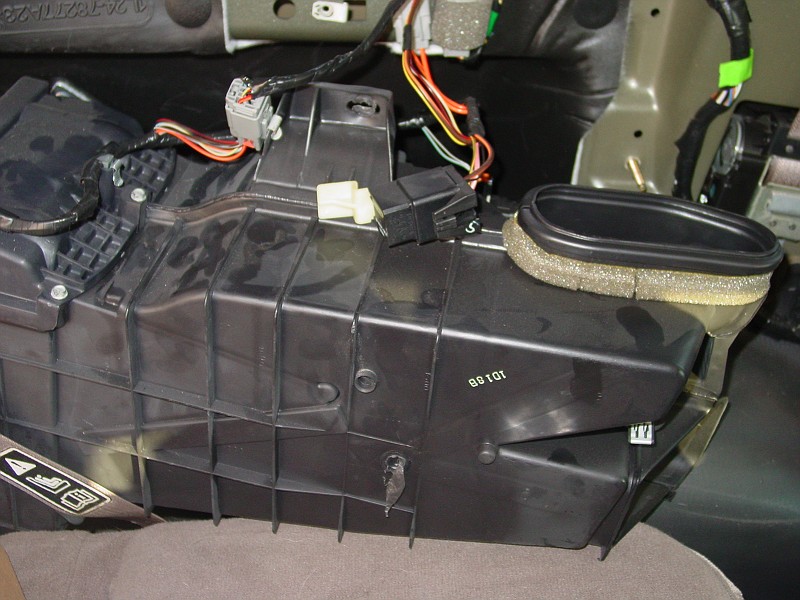
Now we can move the blower box out to see whats going on in the back. VERY CAREFULLY slide the box from the long stud and turn the ignition switch on and the AC Fan to isolate the clicking noise.
 After turning the key on, I found that the noise is coming from the temperature blend actuator. I unplugged it and the noise went away. Now you have isolated the culprit, turn the key off and replacement of the actuator can begin. I used a 8mm socket and 1/4" drive ratchet to remove the culprit. There are 3 screws on this one.
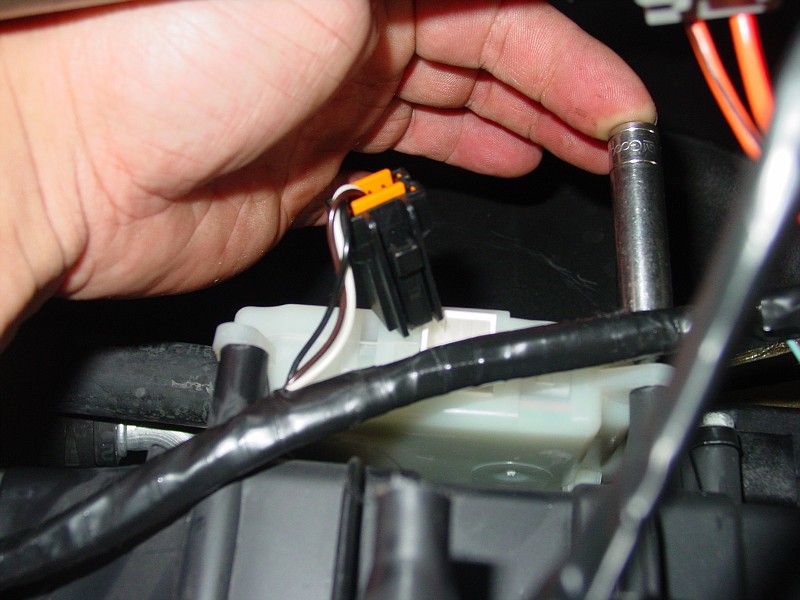 Heres the new part. It's a dealer item only, and cost around 60 bucks.
Now we can put the new part in, plug it in and turn the key and listen for the sound of....silence! Once you have verified the part is in and working and its quiet, reassemble and pat yourself on the back for saving 2.5 hrs at a dealer rate of 70-100 dollars!
38 comments:
Thanks for the discussion on replacing the Ford Explorer damper motor. Your article aided me when I changed mine last weekend. I'm guessing I saved about $300!
Thanks - Brad
Thank you for the note. I repaired my 02 Explorer last year by following your steps. I guess I saved a lot of money. Now I have 04Explorer and it's doing exactly the same thing. I'm going to repair it next week.
Working on repairing this too. We found this article from a link on the Great Explorations forums. Thanks for posting this!
Clear explaination and great pictures. Thanks to your post I (a novice) was able to fix it.
Thanks for the detailed instructions and pictures! I decided to go with the dealer part. Still I saved a bunch of $$ by DIY. With tax $72. Dorman was $53 but comments online about some issues others had made me decide dealer.
thank you very much for the details and pictures ,i have the same problem i tried to do it before but i didn't know what to open to reach the actuator. your subject helped me a lot, thank you again
great post - thanks! 20 minutes to remove, 10 minutes to put back together. the most time was spent getting right part at the dealer. $80 from ford.
Thanks for you instructions. Replaced mine today. Works like a charm. Part cost $72 incl. tax.
Thanks a bunch. Awesome post.
Good step by step instructions. I had to replace this again because I used an after market part two years ago. This time I used a Ford part.
Great write-up! I just replaced the actuator today on my '04 Explorer XLT and all is well! Took me about 2-2 1/2 hours. I used Dorman part # 604-211 (D shaped shaft). Not a bad job; easier than the main actuator in the front that I replaced a month ago.
Just be careful, especially with the step that involves the 13mm bolt and blower box. I over-tightened it when closing out the job and the bolt which has a slotted casing on one end that fits into the frame popped out. I couldn't get it back in place exactly so I did the best I could and taped/zipped tied the blower box to the frame. It doesn't move and has other bolts to secure it. No biggie but just be on the lookout for it. Good luck!
Thank you so much for posting these instructions. I replaced mine this past Sat. The guys at NAPA said I was the 5th person that day that had come in to buy one of these.
Thanks a bunch. I followed your directions and the total job took about 3 hours. You saved me hours of trying to figure out just how to access the parts. I don't have much to add. I suspect those of us with 3rd row seating find the job a bit easier because of the way the 2nd row seat 'rolls forward'. I did take the advice from other blogs, and replaced BOTH actuators at the same time.
What happened to the pictures? I'm about to give this a try.
This DIY guide is exactly what I'm looking for, but for some reason the pictures aren't loading. Did you take them down?
I'm having this exact same problem. This tutorial is just what I'm looking for, only problem is the pictures won't load. Can you please repost?
I'm having the same problem described here and the pictorial is just what I need. The pictures don't seem to be loading up though. Anyway you could check the links or re-post?
Pics are not linking to your blog - any way to get them back (would love to see the pics before undertaking this job on my '03 Explorer)
For some reason I am not able to view the pictures, I have also tried different browsers. Is anyone having a problem? It would be nice to view the photos before I pull my car apart.
thanks
Hello! thanks for the post. My 2002 Explorer is doing that sound and I am planning to work on it, but I cannot see the pictures, can you send me those to my email. moymarquez@gmail.com
Thanks!
I came across this and thought - hooray! Then I went to the comment and none of the pictures came up. Did they get removed?
Hi Ladies and Gents, Photos are back up. My photo hosting company almost went belly up after the hurricane and lost a bunch of pics on their server. Its back up and running now.
Check it out!
This was a great explanation of (how to) you should do a video on this ...that panel with the third row is such a pain in the ... it seams that these explorers have alot in common...I have heard of 5 where I live that have the same problems...another which besides transmission...but more Iimportantly...a crack in the coil spring straight through . I was at a shop. And actually seen 3 explorers come in with crack in same place..so keep your eyes peeled..dont forget get that video up..I may attempt fixing my clicking noise with a more step by step video..I am the one that forgets after taking sonethibg appart lol...thank you ...
I just wanted to thank redassaggie00 for posting this awesome walkthrough. I was able to complete this job on my '03 Mountaineer by myself in about 3hrs and I am not very mechanically inclined. The dealership I took it to wanted to charge me ~$550 to do the job, on top of the $50 they charged just to listen to the noise. *Good grief!*
One thing I learned that wasn't mentioned in this tutorial is that at least on my Mountaineer, there are two of these blend door actuators right next to each other. So far as I could tell the only difference between the two is a small difference in how the piece that turns is keyed. I ordered the part off the internet for ~$50. Of course when I finally got everything torn apart, it turned out that it was the other part that was clicking. Fortunately for me, O'Reilly had the part in stock for about the same price as what I paid for the first one. I ended up replacing both and have had been enjoying the sound of cool air blowing and nothing more.
Actually, all dual air 02-11 Explorers have two actuators back in the rear.
My instructions probably should have been a little clearer, but I do state "isolate the noise" because there are two.
Glad you got it fixed!
Great article. I did not find this until I had the plastic panels off and was not sure where to go from there. The pictures showed where to find the motors.
On my 2004 XLT, 3 seat, there was no 13mm nut and was 10mm.
Thanks Joe
Thanks for the detailed post! Just finished replacing both motors on my '05 Explorer.
Thanks for the post!
It prepared me for the task in hand!
Just a nugget of info for others
I have an 2004 Explorer EB.
Upon opening up the side, and sliding out the blower assembly, it turned out to be the actuator closest to the rear of the vehicle that was clunking.
This is the blend door actuator, the other actuator (closest to the front of the vehicle) is the 'Mode' actuator (i.e. Air to the feet or air to the roof vents)
The part cost me $101 from the Ford Dealership (Charlotte NC)
Thanks again for the great posting and pictures!
G.M.
Thank you so much, very well documented and saved me over $300 by doing it myself. If you had a paypal account link here I'd make a donation.
Another Ford owner wants to thank you for your post. Excellent descriptions and pictures made the process a lot easier.
Thank you!
Outstanding post with great pictures. This really prepared me well for the task. I have an '02 Mountaineer. The aft actuator was bad but I also replaced the forward actuator as well since I had it apart. Ford refers to the rear A/C system as the Auxiliary A/C External Components (with AUX OVERHEAD HEATER AND A/C). I ordered Dorman Actuators from Walmart online and picked them up at my local store. Both actuators cost me $65 plus tax. Local Ford dealership told me that usually it's the Temperature Control Air Door Actuator (the actuator closest to the rear of the vehicle) that goes bad. Dorman # 604-202 with D shaped shaft $31.30 The other actuator, that is mounted closest to the front of the vehicle is called the Rear Air Distribution Control Actuator. It sends air to the ceiling or floor of the vehicle. Dorman # 604-213 with cross shaped shaft. Actuators are the same exact price on Amazon also. These part numbers mentioned were for my particular vehicle so you need to really check for fitment on your particular vehicle because some are different part numbers. Thanks again for a great write up!!
Thank you for posting this. I have a 2010 Explorer and just found that the rear air diverter actuator is clicking. First decision that I have to make is if I want to use my ESP warranty. Don't know if it will be covered and there is a $100 deductible so I am leaning toward doing it myself.
My issue with the DIY option is what replacement to use. I will most likely replace the blend door actuator also while it is apart. There is the aftermarket part of which I have seen at least 3 brands so there is the quality issue there. There is the Ford part which isn't that much more money but did they update it or will it fail again? Then there is a website called blendDoor that sells just the gear that breaks for $$20(Blend Door Actuator Gear Rebuild Kit (Fits Ford Lincoln Mercury 1990-2012) ).
I'd like to buy 2 gears and change them both.
Sorry for the long story but it looks like it's been a while since you all have done the repair, how did you choice of parts hold up? Any other input on the quality issue that I am facing? Thanks!
Hi Rob,
We sold the explorer in 2011 to a friend, and to my last knowledge the repair has held up well.
Dorman apparently also makes replacement actuators now as well.
Thanks for the response. I ended up ordering 2 gears from BlendDoor. I am going to put them in today. Hope that was the right choice. I would love to hear from any of the previous posters about how their choice in parts held up. Aside from that, I am always amazed when a manufacturer lets a problem like this go on for years without updating a part. I see a lot of posts from people with Explorer models going back to 2002. Mine is 8 years later and it's just amazing that the same part is still causing problems and at $500 to fix at the dealer, it's not a minor annoyance. The same part is apparently failing as far back as 1990 on other models according to BlendDoor's listing.
Unfortunately Rob, its not just Ford that has these actuator issues. GM Trucks and SUVs, Toyota and Lexus cars and SUVs etc all suffer from these failures. Car companies these days just screw things together. They design, buy and put together the majority of the vehicle. With the exception of the engine main components, and even then, many parts are co-developed.
Can't thank you enough.Sorry you may have found out the hard way but am grateful for you sharing this info.Absolutely am grateful & you should definitely be commended as a do it yourself.Once again thank you.
I want to thank you for your excellent pictures and instructions on how to change out the actuator on my Ford Explorer. I was able to get the job done by following your instructions and this is coming from a 68 year old Grandma. I especially was glad you had a list of the specific tools that I would need to get the part out easily. I did have to purchase a couple of tools but they sure got the job done quickly and easily. Now I don't have to listen to that insane clicking all the time. Thanks so much!
great stuff bro problem solved you'r a pro.
Post a Comment