Monday, November 26, 2012
More on Brakes

Thursday, July 8, 2010
Everything you ever wanted to know about Brake Fluid
Brake fluid is categorized by the DOT rating. Most new cars will be equipped with DOT 3 brake fluid. Your germans and supercars may use DOT 4, and very few will ever use DOT 5 will come in motorcycles and is a silicone based product.
Chemically speaking, the off the shelf brake fluids, like DOT 3 are based on glycol and glycol esters. DOT 4 is similar in composition except it contains borate esters. New to the brake fluid world is the DOT 5.1 that is made of of borate esters.
Do you know what real job of this fluid is? Brake fluid transmits pressure from the brake pedal to the ends of the brake system, where the calipers or drums are. This force from the fluid is applied to the pads (or shoes) against the rotation of the brake disc/drum.
Its the fluids rating or strength not to compress that allows it to do its job well.
Back to the Mr Wizard lesson. Did you know that H2O is not listed as an ingredient of brake fluid?
Duh!
Water boils at 212 around degrees F. When braking, the rotors can and get HOT...over 1000 degrees of heat and transfer 400 of those guys or more to the caliper. Agua is not a good fluid to choose.
Unfortunately, Brake Fluid is hygroscoptic. DOT3 and DOT 4 brake fluids attract water. Right out of the air. Just like the coolant you use is probably glycol based just because it mixes well with water.
So, what do the numbers mean?
The DOT Numbers are the boiling point ranges that they achieve both dry (no water absorbed) and wet (about 3-4% water content). DOT 3 the dry boiling point is at least 401 and the wet 284 degrees. DOT 4 steps its game up to 446 and 311 respectively. Remember, that these are DOT minimums, and there are high performance brake fluids that exceed those ratings.
Some of the high performance fluids are rated well over 500 (to almost 600) degrees boiling point dry. Wet boiling points will also vary, but be well over 400 degrees.
The higher boiling points are critical to those of you that like to get your roll on at a race track or autocrossing. Once you boil your brake fluid, its done. You'll need more fluid. Sorry atari.
Most non racing folks will that their brake performance is just fine by sticking with the fluid that the manufacturer sold the care with, unless they use they hoon the vehicle to the extreme, such as a Autocross, Track, or if you live in the mountains and stuff. How do I know when this happens? You'll know because the brake pedal will start to feel like mashed potatoes as the fluid boils and the pedal may even fall to the floor.
Most joe blows never flush and replace their brake fluid. In fact, if you go to a shop and have a “brake job” done it is highly unlikely that they will do much more than bleed the brake lines. This means that the old – wet – clapped out – brake fluid will still be there. The water can react to oxidize brake components from the inside out. I recommend once a year, at least have a look at it. If its nasty, flush and replace with fresh brake fluid.
If you want to DIY, buy a Motive Bleeder or call a friend over, this can be done at home. If you cant change your own engine oil, go pay someone else to do this.
Unless your factory manual specifies something different you start with the right (passenger side) rear, then move to the left (drivers side) rear, then the right front, and finally the left front.
If you dont have a bleeder, you will have to work in concert with your assistant at the brake pedal. The goal is not to get any air introduced into the system while you bleed it. To prevent air from entering you need to keep the reservoir from going empty. So check it often and add new fluid as needed. If you do have a bleeder, keep the pressure up.
You should also remove as much of the old fluid from the reservoir before you add new fluid to the reservior. A turkey baster or similar device will allow you to do that. Just have spray “brake clean” ready in case any fluid get on painted surfaces. If left on paint it will remove it. PROTECT YOUR EYES.
You will need to continue this until you get nice, clean, new fluid out to the particular brake you are working on and then repeat for the other three. Be sure to keep enough fluid in the reservoir to prevent air from entering the system from that end.Brake fluids gain contamination as they age and should be replace periodically. If you race you should change your brake fluid as often as you change your oil.
Friday, August 21, 2009
More Child care funnies







Thursday, May 21, 2009
Ford Five Hundred Cabin filter
How much of this dust is SUCKED into the car and into my lungs? Surely, Ford has decided to put a cabin filter in their newest sedan in their model line up. Nope.
Not only is air quality of concern, but its unhealthy for the AC system. Dust on the blower motor and evaporator core wreak havoc on the system.
However, they did have a cutout for where one SHOULD be.
So I checked around. The 2008 Taurus which has a cabin filter, uses a popular number, that many cars, including Acuras use. So I went out, picked up a cabin filter, and armed with my dremel and a fine toothed hacksaw, I went to work.
This mod is applicable to the 05-07 Ford Five Hundred, Ford Freestyle, and Mercury Montego. I am not responsible for you destroying your evap case due to poor decision making on your part.
You'll need to to get all your junk out of the glove box.
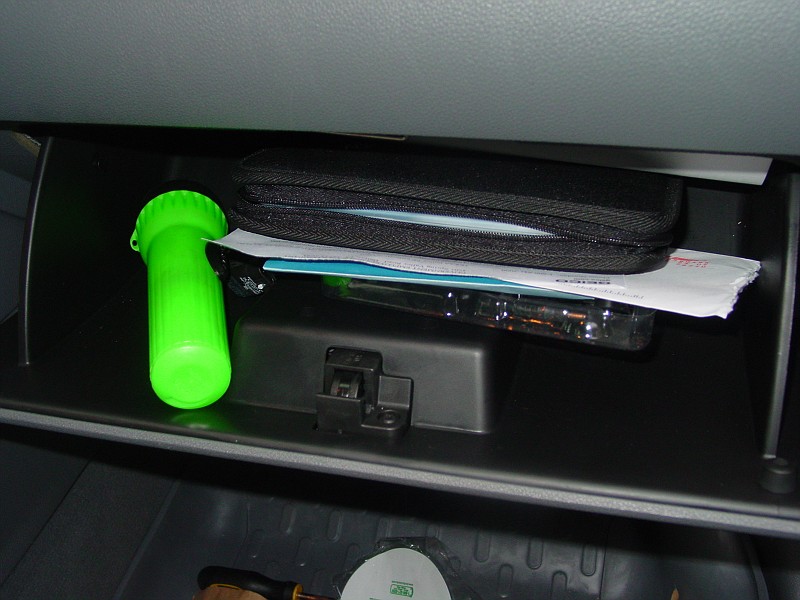
Next, you want to pull up on the button as shown here.

Now you have access to the evap case.
Notice Ford had made provisions for Cabin filter access cutout in the blower box.
You'll want to cut between the 2 ridges. All the way around. Dont worry about being perfect. Keep it between the ridges, youll be fine. Dont throw the piece you cut out away.
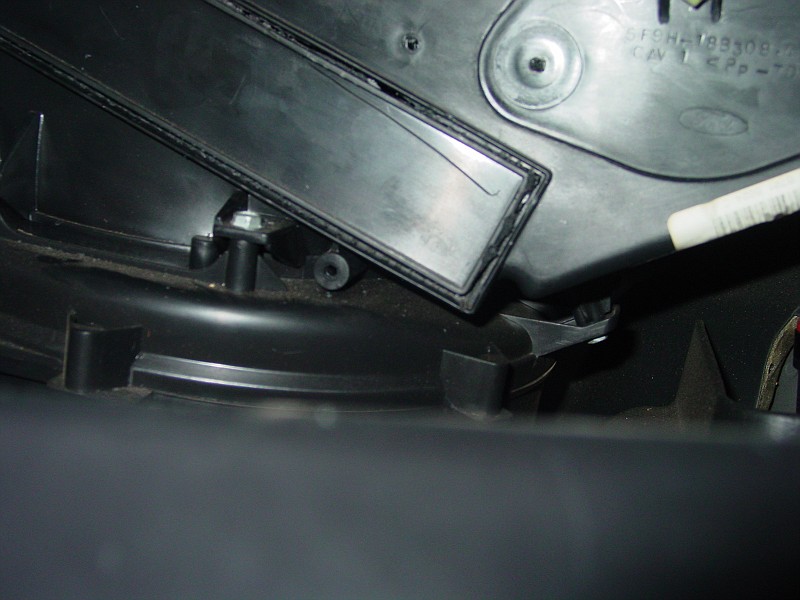
Now heres the cutout removed. Notice that Ford had every intention of having a filter here. Square opening, flat floor ridges, etc. Also notice the amount of dust in there. Blech. Windex and paper towel time.
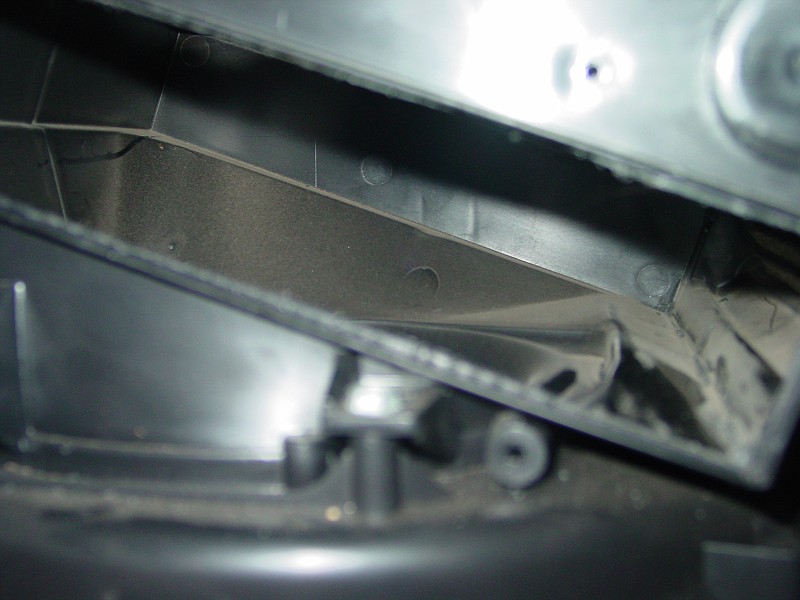
So heres our new cabin filter installed.
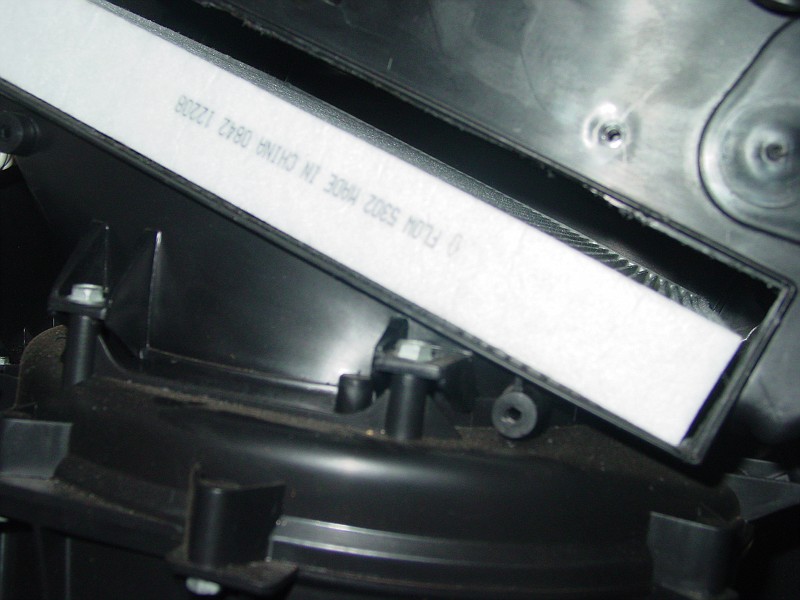
Now heres the piece we cut out, back in place, and some Aluminum tape, holding it all in. Not the prettiest, but functional.
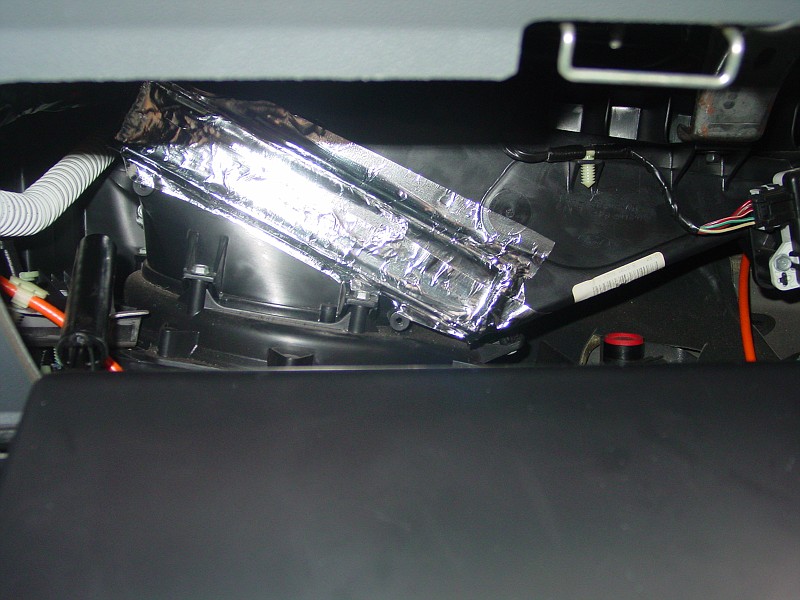
Now I can enjoy clean filtered air! Most manufacturers recommend annual replacement, so I'll check in a year from now and we'll take a look at that filter!
Tuesday, April 14, 2009
Garage Door Opener Issues
Its been getting noisy over time but I didn't realize how much until it completely failed Monday morning. If I didn't look in the rearview mirror and saw darkness. Got out and I hear the motor running, but the door had only moved about 3".
Well, looks like I have problems, but I'm on the way to work, so lets open and close manually and have a look later.
Well, this is what I found when I got home.

The gear that is driven by the worm gear has eaten itself alive. Upon further research, this gear needs to be lubricated regularly, which it obviously has not been. I've lived here almost 4 years and I've only greased the rollers and lubed the chain.
So off to Sears service center I go. Well, guess what, Sears cannot help unless you have the model and serial number. This happened to me about 12 years ago at this same place. Why should it be different now? I get online on ebay, theres a seller there that has the gears. I call his #. He asks "Do you have the optical eye at the bottom of the door?" yes, I do. Then tells me "its the same gear from 1984 to today". Why can't sears figure that out?
I ordered the kit, it arrived in 3 days. My next post will illustrate replacement and chain adjustment.
Friday, January 2, 2009
Citrus Marinated Grilled Shrimp and Spicy Rice
I just took the shrimp, de-vined and marinated in lemon juice, orange juice, and fajita seasoning, covered with saran wrap and refrigerated for about an hour. Afterwards, I skewered the shrimp and grilled them, using a brush and some olive oil to keep the shrimp nice and oiled.
Next, I just took a pound of ground turkey, and taco seasoning, browned it and seasoned per instructions, and I made spanish rice (using the chinese rice cooker) with Tomato Sauce, Cumin, a can of Rotel Stewed Tomatoes, and chicken stock, then I mixed it all together.
The end result?

Wednesday, November 19, 2008
More Cookin
Heres one I tried a week ago. Home Made Fried Chicken, Mashed Potatoes (from Scratch not a box you lazy guys!), Creamed Corn and a Salad. Really? There wasn't a lot of prep involved. This was an easy meal to make.
Heres the meal in progress....

And the finished product......

Probably not the healthiest choice with the Fried Chicken, but a nice home cooked meal really feels good on a Sunday night!
Tuesday, November 18, 2008
2nd Gen Lexus GS300 Valve Cover Gaskets
"Gasket(s)?" You ask? On a GS300? Isnt that an inline 6? Why yes, yes it is. But Lexus has separate valve covers. One for Intake Side, and one for the exhaust side. So I went ahead and ordered the gasket set from Oreilly Auto Parts, which carries Fel-Pro.
For this project you'll need:
-Standard set of tools, specifically allen wrenches, 8,10,11, 12 mm sockets, a ratchet
-in-lb torque wrench
-Gasket Set
-RTV Sealant
-Brake Cleaner/Carb Cleaner
-Rags
Here you'll see the view of the intake assembly. The intake tube, throttle body and "Y Pipe" all have to come off, but you have to take each piece off, remembering to mark Vacuum hoses and electrical plugs if you can't remember where they go. Note the water bypass hose. Remember to put the clamp back on when you slide the hose back. The "Air intake chamber" Does not have to be removed to do this job.
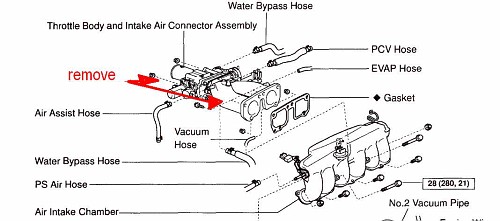
Now that you have all that out of the way, you have easy access to both valve covers. You may have to unplug some of the ignition coils or the spark plug wires. BE VERY CAREFUL: these plugs are brittle from heat cycles and could crumble!!
This is also a good time to replace the plugs if you haven't done so in a while. I like NGK or Denso Plugs in Japanese cars.
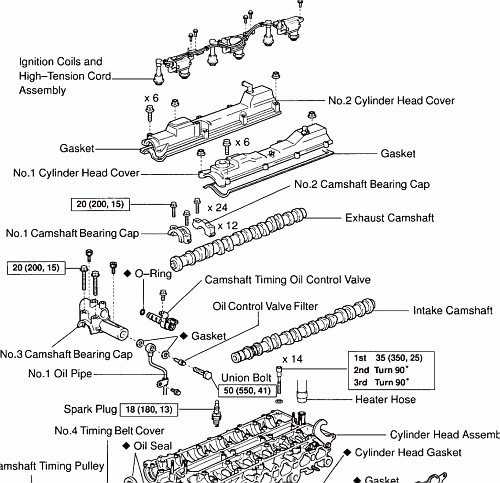
Remove both valve covers and use the cleaner and a rag to clean the mounting surfaces of the cylinder head, paying attention to the front of the cam where the RTV sealant is.
Next, remove the old valve cover gaskets. This car has 180,000 miles on it, and the gaskets were hard and brittle and were no longer doing their job. Clean the seating area of the valve covers well and if you like, apply a gasket sealant to the inside of the valve cover where the gakset rides, and insert the new gaskets.
Go back to the car and apply some RTV sealant where the cams ride near the timing chain to help promote a good seal. Let this set a few minutes (10-15 in warm weather).
Now, we're ready to put the covers back with the new gaskets. Sit the cover on the cylinder head and replace all the bolts and 2 nuts, finger tightening each one and then using the in-lb torque wrench to snug to 95 in-lb. Start from the center and criss cross the bolts all until snug at 95 in-lb.
Now, throw it all back together. The Y Pipe has two very small vacuum lines and a larger one on the firewall side. Dont forget about them. Reinstall the Throttle body and the coolant line, make sure you put the clamp back.
Now for the intake tube. Plug all the electrical connections back in and you're ready to go!
Start the car and check for leaks.
Monday, November 17, 2008
Believe it or not, I love to cook
Recently I picked up some Pork Chops on sale at HEB. I usually grill the pork chops, but now I have an easy and tasty way to make em!
Preheat oven to 350.
Thaw them out, I let them season with Fajita seasoning for about an hour in the fridge, covered.
Rub with olive oil, then coat with Italian seasoned bread crumbs. Then put the chops on top of a 2 layered pan, one with the vents on top, to let the juices run into the lower tray.
Bake 15 minutes on each side at 350. Serve em with whatever you like! Sorry boys and girls, no pictures. I'll take some next time!
Tuesday, June 17, 2008
Lifetime Warranties
Now I find that products that are bought are just total crap. Recently I've been noticing more products have a "Lifetime Replacement Warranty" or maybe a longer than typical warranty.
Example, last spring, I bought one of those fancy "Dial A Sprayer" garden hose attachments, you know the chrome ones with the rubber grip and 63 selectable settings, Shower, mist, angle, cone etc. I think I paid around 12 bucks for it.
After I got home, I noticed the tag. "Life time replacement warranty". Hmm. Interesting.
Let me take the tag off and staple the sales receipt to it, and put it in the 1 gallon ziploc I have for 'warranty' stuff.
Well here it is, the peak of watering season 2008 in Texas. I'm noticing that the chrome is starting to come off on the sprayer, not in little pieces, but in big chunks. So I keep using it, until all the chunks of chrome are gone, and now, the pot metal underneath starts to turn white and deteriorate. Hmmm didn't I remember something about a warranty?
So I found the receipt and warranty info. A quick filling out of the form on the Gilmour website and I had a response 3 days later, promising me a replacement. I asked how I should send the old one back, and the lady said just to chunk it.
Now, I have to say, one one hand, I'm delighted that their warranty service is that wonderful, no questions asked. On the other hand, it irks me that the company doesn't even care enough to find out the cause of the defect, that it would just be cheaper to throw the customer a new one rather find out what the root cause of the issue is.
Another company that is good on warranty is Delta Plumbing Fixtures. No questions asked. Call them with the model number, and its a lifetime replacement on anything newer than 1995. I've had my water diverter cartridge in my shower replaced twice with their warranty (labor not included of course), each time I've had a new cartridge show up on my doorstep via UPS. Its wonderful.
Anyone else have a 'good guys' product they use/like?
Thursday, April 3, 2008
Spring Planting time!
The pansies survived this time around, but now I'm gonna pop them out and put some spring stuff in. I already have my tomato plants in the ground, and I just have to work on the corner plot now to get it weeded and some mulch added in.
For those of you who aren't already using this stuff, I have used Scotts Bonus S MAX for the last two years in a row, and have had ZERO fire ants in the yard. You do pay more but man does it do a good job of keeping the fireants out, and keeps the yard looking nice throughout the summer too!
Friday, March 28, 2008
Kia Sorento Crank Sensor
My neighbors, have a 03 Sorento with 99K miles. It died on them mysteriously the other day, and they had it towed home. The car starts and runs but you rev it and the check engine light comes on and it dies.
Well, I scanned it and it comes up with a Crank Sensor Fault. Heres the problem, the crank sensor access requires timing cover removal....which requires FEAD removal. This project is not for the faint of mechanicals but can be done in around 5 hours if you have air tools. This would also be a good time to replace your FEAD belts (3 of them) and inspect your timing belt. My neighbors had the belt replaced at 60, so we wont touch them.
The sensor is a Borg Warner CSS1002, and is available at Pep Boys for around 130 bucks. Its a simple operation, take everything off, and put it all back together.
What about the 10 year, 100k warranty, you ask? Read the fine print. The warranty is a bare bones deal, covers the block, crank, and certain hard parts. Nothing like sensors and other stuff that tends to fail with heat soak. So, what happens if you end up not having a neighbor like me? Your first instant reaction would be "Oh I have a warranty", and have it towed in, and then letting the dealer tear it down, and then tell you its not under warranty. I asked my neighbor to call and ask what it costs to do the repair at the dealer. HE was quoted "Around 750 dollars" OUCH!
Thursday, March 20, 2008
Time for another trip to the store!
Remember my trip last time?
Anyone else care to play? The lady behind me was getting impatient until she started looking at the screen. "Wow, almost 17 dollars off??? Thats really good!"

Tuesday, March 11, 2008
Used Oil Analysis....More Car fun...
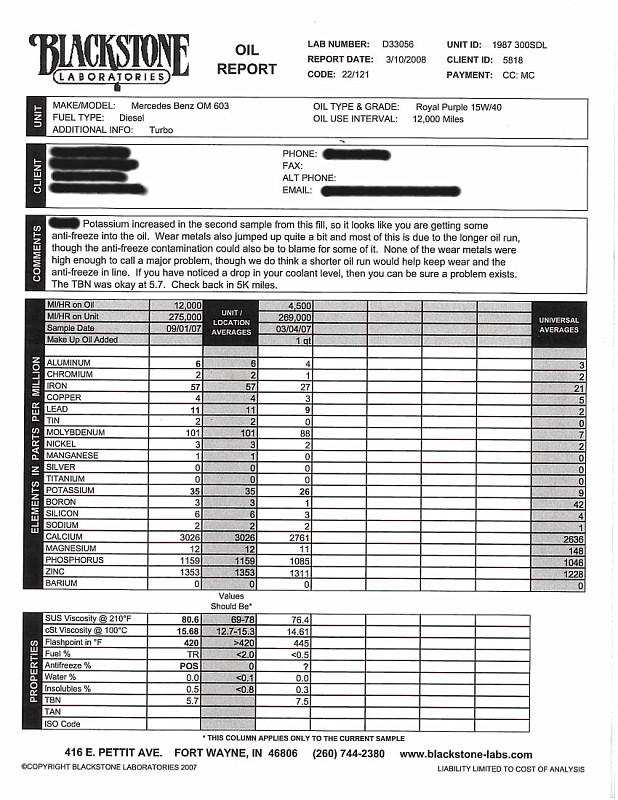
On my diesel Mercedes, I run 12,000 miles between oil changes. Yes thats right, twelve thousand. I do change the filter and top the oil off every 3,000, and at 6,000 and when I change it, I send a sample in to Blackstone Labs for a UOA or "Used Oil Analysis". Theres two reasons I do this.
- I want to know whats going on with my car. I'm approaching 280,000 miles quickly and its nice to know whats going on inside. Kind of like bloodwork.
- I use Synthetic Oil, which is costlier but one of the key benefits I like is better protection and extended drain intervals (or so they claim)
- Extended Drain intervals means less impact on the environment, even if you do recycle the oil.
So the last UOA report I just got in, shows that wear materials are high, and potassium is high. I spoke with a guy at the lab and he explained that just changing the filter isn't going to remove the amount of wear materials (iron copper etc) from the oil, and most certainly not coolant. Now if I had a bypass filter on this car, then I would be fine for thousands of miles more, but how far are we going to take this on a car fast approaching 300,000 miles?
Anyway, heres a link to the report.
I think the plan here is to change the oil at 5,000 this time and send a sample in again to see whats going on. The odd thing is, I'm not losing any coolant. Go figure.
Saturday, February 23, 2008
Tech Post: Modular V8 Ford AC Compressor bypass/delete
He doesnt want to replace it, since he will buy a new truck soon, so we improvised.
After looking at this 1998 F150 4.6L Pickup, it was determined that the Compressor itself wasnt bad, but the clutch gave up the ghost.
How do we do this? Well, theres actually two trains of thought here.
1. Work around it....
2. Rip it off and plug the lines.
Looking at the belt routing and tensioner, I can just bypass the compressor but to keep tension, I want to run the belt OVER the idler, instead of under. This wont be that hard. I wont bore you with the how to of taking a belt off and replacing a pulley. If you cant do that, you shouldn't be attempting this workaround/repair.
We got out the Gates catalog and started looking. I found a 6 rib grooved pulley (to help keep the belt in place) and a shorter belt. In this case, after trial and error, we found the best combo was a gates Micro V #K080806 or equivalent, and buy gates 38053 idler pulley. Boom and done.
(See below. You will replace Item #1)

If you want to pull the compressor, run Ford Racing's AC compressor delete bracket, or, Dorman Products just released their version last year for much less. Look at Dorman 34188, AC compressor delete assembly. Amazon has it, and oreillys and auto zone can order it for you. Keep in mind you MUST plug the refrigerant lines properly if you plan on running AC again in the future to avoid contaminating the system.
In this case, we kept the compressor in place and kept the system sealed and the truck was traded.
Friday, February 1, 2008






Thursday, January 31, 2008





Wednesday, January 30, 2008
Tuesday, January 29, 2008





Monday, January 28, 2008
Baby Care, Episode 1