Showing posts with label Car Repair. Show all posts

Monday, March 9, 2020

Radial tire push/pull, My experience

This isnt a common issue but there wasn't a lot out there to help folks, So in case anyone comes up with this problem and searches on the interwebs, this can hopefully help someone!

Car in question is a Ford Flex AWD, new tires installed July 2019, Yokohama YK740 GTX (Discount Tire exclusive).

Car had new Struts, shocks and strut mounts installed in October.

In December, I was driving on a crappy Houston road and hit a pothole, which blew out my left front tire. I swapped the tire out for the donut, limped home, and went Discount Tire Monday morning. They warrantied it (I bought their certs) and had me on the way.

A Day later, I notice over 55, there's a rhythmic noise. The faster I go, the louder it is. Order a hub and bearing assembly from the dealer. Attempt to remove the hub the following weekend. Impossible. Slide hammers, heat, pullers etc. Nothing can be done to remove this thing. Decide to abandon that plan and bought a used bare knuckle from LKQ from a wrecked taurus for 29 bucks. Get knuckle in, remove all associated parts, install new knuckle and CV Halfshaft while I'm there, and hub assembly. Button car back together. Drive it, and its great.

In January, I got in to Discount for a Rotation and Balance. On walk around, the salesman notices the left rear tire has a little gash in the sidewall, probably from the same pothole. They order a tire from another store, and install it on the right front (I rotate cross pattern for AWD). Sent me on my way.

A week later, I notice when I'm accelerating hard to get on the freeway, I have to hold the wheel left a little to keep it straight. The steering wheel isn't cocked right when accelerating, but if I didn't hold the wheel it would veer hard. Letting off the pedal set it straight again. My first thought is that I had disturbed the alignment when I had replaced the knuckle/hub. So we go in for an alignment. Everything is within spec except toe, both front wheels are slightly toed in but not way out of spec. Get the car out, still does it but not as bad as before.

Today, I dropped by my local discount tire. Talked to the guy I know, and asked him if he had any suggestions. We both agreed that swapping the tires left to right on the front would be the first step. After we swapped the tires side to side, I could tell before I left the parking lot that the pull was now going towards the left. Turned around and went back inside, and he moved suspect left front tire to the rear on the left side. Pull is gone. So He advised me to call him before my next rotation and he would order a replacement tire and swap the defective tire out. What happens is one of the belts shifted during the manufacturing process and you get something called radial pull (or push), which causes the car to drive funny. The issue isnt as obvious on the rear, but in another 5000 when I go back for rotation, it will be an issue again.

See this diagram from aa1car.com that shows the layers of belts.  If one of those plies moves during manufacturing (its impossible see once the tire is manufactured) there is what is called a "Conicity problem"  Meaning the tire takes on a cone shape when inflated.  Acceleration forces make it worse which is exactly what I was experiencing. 


Fortunately, my local tire store has good guys working there and took the time to help diagnose my issue, before I went and spent too much time and money chasing ghosts, or handing the keys off to a dishonest repair shop!

Friday, December 10, 2010

Ford Customer Service...what customer service?

Many of you know that I am a HUGE Ford fan. I bleed blue. I have driven nothing but Fords since before I got my license. Lots of Crown Vics, F-Series, Mustangs, Super Duties, Marauders, a Five Hundred, a Countour SVT, and most recently I ordered a 2010 Taurus SHO about a year ago. I have always recommend Ford products to my friends, and many of them are very pleased with their purchases. I guess I got bit on this one.

Well, she arrived right before Valentines Day 2010. I loved her from the Get-go, she was pretty, she was fast, and stealthy. I special ordered because nobody had what I wanted. I wanted the Performance Pack, which had special brakes, a different axle ratio, and stiffer springs and struts. It was worth the wait.

So around June of this year, I notice that when I'm leaving the neighborhood, the engine stutters/falters a little when I'm waiting for the light to turn green. This happened every day, and to the point where I started trying with the A/C on, A/C off, etc. Still did it.

It concerned me, and I made a note to take it in to the dealer to have it looked at. Around September, the brakes exhibited a groaning noise at low speeds, and I also noticed, while moving the car down the driveway, I noticed a clicking noise when going from Park to Reverse, and then Reverse to drive. This was enough to warrant taking the car in to be looked at.

I took the car into Tommie Vaughn Ford in Houston, where I bought the car from. They had the car in for three days. Their solution was to reflash the PCM, perform the brake TSB, which addressed the groan, and clearly stated, for Performance Package Taurus SHOs, NOT TO REPLACE THE BRAKE PADS. Guess what? They replaced the pads. When I picked the car up, I read the paperwork and pointed out to the advisor that the TSB was performed incorrectly. The advisor also told me that the clicking noise was gone. He offered to change the pads back to the original ones, however, I had no time, so I just got them back and left.

When I got the car back, I noticed that the clicking noise was still present, as well as the rough idle, to the point where the car died, however, immediately restarted. I called the Dealer and talked to my advisor, and explained that I was really disappointed. I buy from Tommie Vaughn for the good reputation. I took it for service there because thats where the car was purchased. I know Ford doesn't offer loaner cars unless you buy extended warranty, so I didnt expect them to provide me with alternate wheels, but I asked what his suggestion would be to resolve this problem. He told me to bring the car in and they would give me something to drive. I took the car in again. This time, they kept the car for 9 Days. I drove to the credit union to make a car payment in a rental car.

I picked the car up, they replaced the spark plugs, and the brake pads (to the correct ones) and the Brake Calipers. Supposedly the cause of the clicking noise. When I picked the car up and left, I noticed that the brakes didnt feel quite right. I brushed it off as to having driven a different car for a week and I'd get used to it. Well, when I left the office that evening, first stoplight, the brake pedal goes to the floor. To add insult to injury, while waiting for the light to turn green, the car exhibits the rough idle again. I immediately called the dealer. He advised me to bring it in.

Over the weekend and part of the next week, I drove my other vehicle, because I did not feel safe driving the car in the way that it was with the soft brakes. I did take the car in, around November 16th and I met with the Service writer, as well as the Service manager. I explained my frustration that this was the THIRD time the car was going in. He assured me that this would be taken care of and put me in another rental car. I suggested getting a Field Service Engineer involved or Ford direct. Later that week, my advisor called and said that they found #1 Cylinder was 'dropping out' and coming back. Ford techline advised them to move the spark plug and coil somewhere else to see if the 'drop out' followed. It did not. Ford techline suggests that the dealer replace the fuel injector, so they "emergency ordered" an injector. On the Wednesday before Thanksgiving, I got a call stating that the injector was in, and the technician would be installing the injector to see if the problem was fixed. Friday, I called the dealer and talked to the service advisor, and he told me that the tech that was working on my car was on vacation, and that I would need to check back on Monday. Monday, my advisor calls me and says that the Shop Foreman actually drove my car and the problem was still present. So the FSE told them that they wanted to swap the computer, and could I bring my other key to the dealership, since they would need to reprogram both keys. I took my spare key to the dealer and my service writer was not there.

I spoke to the service manager after he got back from lunch. I asked him for an update, which he was not aware of any further updates. I told him to keep "throwing parts" at the car until they had it fixed. He said "Well, we're not throwing parts at it, we're diagnosing." Lets see. You have reflashed the PCM, Replaced Spark Plugs, Moved Coils, replaced the Fuel Injector, and now, you want to change the PCM. If thats not throwing parts at the problem I'm not sure what is.

Later that week, my advisor called and told me that the SHO they had on their lot that they were planning on swapping PCMs with did not match my car, however, when they pulled the spark plug on #1, the technician saw "Something Shiny" down the plug hole. So the Ford Engineer asked them to pull the head. The advisor thought that the engine would have to be removed for this operation and I tended to agree with him. This was around December 3. Over the weekend, I went to the dealer and took photos of my car sitting on the rack, which the exhaust unbolted, in various stages of disassembly. Looked like they were well on their way.

Tuesday, December 7th, I called the dealer for an update. The advisor had left, so I talked to the Service manager. He advised that they were told to pull heads by the Ford Engineer. Which I already knew. He claimed that the engine did NOT have to be removed.

Wednesday, December 8th, My advisor called around noon to tell me that the heads were off and the valves were "Carboned up" Like you would not believe. Then he starts asking me about what kind of Gasoline I used. I told him, Premium, only Chevron or Shell. Then he told me that the service manager said that only 87 should be used. I told him that I thought this was incorrect, they may want to check the owners manual in the car, as well as on the gas tank door. 87 Octane is acceptable, however, 91 or better is recommended for optimum performance in the SHO motor.

So here we have it folks. As of December 10th, 2010, I have a car that has been in the shop for a total of thirty six days. I have made two payments to the bank in a rental car.

Frustrated? Yes.
Angry? Yes.
Feel like I'm not being taken seriously by Ford or the Dealer? Yes.

Maybe its a lemon I have, but I feel like I'm not being given priority or consideration in this matter. The dealer blames it on their lack of Knowledge on the Ecoboost engine. I don't care what it is at this point. I'm tired of being jerked around and tired of being told one story to the next. I've always been a Ford product advocate and right now, I feel like its a huge slap in the face. I have a damn near 40,000 dollar paperweight that I don't see or get to use. Instead, I'm driving a Budget rent a car Hyundai. Thanks a lot Ford.

Thursday, July 8, 2010

Everything you ever wanted to know about Brake Fluid

How exciting!

Brake fluid is categorized by the DOT rating. Most new cars will be equipped with DOT 3 brake fluid. Your germans and supercars may use DOT 4, and very few will ever use DOT 5 will come in motorcycles and is a silicone based product.

Chemically speaking, the off the shelf brake fluids, like DOT 3 are based on glycol and glycol esters. DOT 4 is similar in composition except it contains borate esters. New to the brake fluid world is the DOT 5.1 that is made of of borate esters.

Do you know what real job of this fluid is? Brake fluid transmits pressure from the brake pedal to the ends of the brake system, where the calipers or drums are. This force from the fluid is applied to the pads (or shoes) against the rotation of the brake disc/drum.

Its the fluids rating or strength not to compress that allows it to do its job well.

Back to the Mr Wizard lesson. Did you know that H2O is not listed as an ingredient of brake fluid?

Duh!

Water boils at 212 around degrees F. When braking, the rotors can and get HOT...over 1000 degrees of heat and transfer 400 of those guys or more to the caliper. Agua is not a good fluid to choose.

Unfortunately, Brake Fluid is hygroscoptic. DOT3 and DOT 4 brake fluids attract water. Right out of the air. Just like the coolant you use is probably glycol based just because it mixes well with water.

So, what do the numbers mean?

The DOT Numbers are the boiling point ranges that they achieve both dry (no water absorbed) and wet (about 3-4% water content). DOT 3 the dry boiling point is at least 401 and the wet 284 degrees. DOT 4 steps its game up to 446 and 311 respectively. Remember, that these are DOT minimums, and there are high performance brake fluids that exceed those ratings.

Some of the high performance fluids are rated well over 500 (to almost 600) degrees boiling point dry. Wet boiling points will also vary, but be well over 400 degrees.

The higher boiling points are critical to those of you that like to get your roll on at a race track or autocrossing. Once you boil your brake fluid, its done. You'll need more fluid. Sorry atari.

Most non racing folks will that their brake performance is just fine by sticking with the fluid that the manufacturer sold the care with, unless they use they hoon the vehicle to the extreme, such as a Autocross, Track, or if you live in the mountains and stuff. How do I know when this happens? You'll know because the brake pedal will start to feel like mashed potatoes as the fluid boils and the pedal may even fall to the floor.

Most joe blows never flush and replace their brake fluid. In fact, if you go to a shop and have a “brake job” done it is highly unlikely that they will do much more than bleed the brake lines. This means that the old – wet – clapped out – brake fluid will still be there. The water can react to oxidize brake components from the inside out. I recommend once a year, at least have a look at it. If its nasty, flush and replace with fresh brake fluid.

If you want to DIY, buy a Motive Bleeder or call a friend over, this can be done at home. If you cant change your own engine oil, go pay someone else to do this.

Unless your factory manual specifies something different you start with the right (passenger side) rear, then move to the left (drivers side) rear, then the right front, and finally the left front.

If you dont have a bleeder, you will have to work in concert with your assistant at the brake pedal. The goal is not to get any air introduced into the system while you bleed it. To prevent air from entering you need to keep the reservoir from going empty. So check it often and add new fluid as needed. If you do have a bleeder, keep the pressure up.

You should also remove as much of the old fluid from the reservoir before you add new fluid to the reservior. A turkey baster or similar device will allow you to do that. Just have spray “brake clean” ready in case any fluid get on painted surfaces. If left on paint it will remove it. PROTECT YOUR EYES.

You will need to continue this until you get nice, clean, new fluid out to the particular brake you are working on and then repeat for the other three. Be sure to keep enough fluid in the reservoir to prevent air from entering the system from that end.

Brake fluids gain contamination as they age and should be replace periodically. If you race you should change your brake fluid as often as you change your oil.

Thursday, December 17, 2009

New Years resolutions

Okay so its been a while since I updated my blog and I have been meaning to but really have had nothing to blog about.

Well, for those of you who keep up with me, many know that I had a buddy move in earlier this year, he rented a room in the house and kept his dog in the back yard. Well, I got along with "Tom" just fine, but his dog, who is a 1 year old 100 lb bloodhound, was a different story. Totally unsocialized and crazy. I didn't want that dog coming inside, so a pen was built in the back yard, which the dog promptly dug up and destroyed the grass. I turned the other cheek, since Tom was indeed paying rent. I told Tom that the dog could come in during inclement weather (really cold, rainstorm etc) as long as he was given a bath first. Tom has quite a social schedule and was never really home in the evenings. So the dog stayed in his pen for probably 23 hours a day. On the nights Tom came home late, he would toss dog food out the back door and go to bed.

Now, where am I going with this? Well, last weekend, Tom moved out on Sunday, mysteriously. No Goodbye, no GFY, no see you later. Just gone. I got home and went and looked out the back porch, and the 'dog pen'/mud hole was missing all the cattle panel fencing. The T-Posts were still there (thanks Jackass), and the wood was still there. Missing was the dog house, and rubber mat and his BBQ Pit. This is strange, I went to his bedroom. Everything that was his was missing. Then into the bathroom. Totally cleaned out. I called three times, no answer from him.

Immediately, I started thinking "What did I do?" but I caught myself. I made phone calls to friends from church, and in my support network. They all had the same answer. "Its not you. Its about Tom. You did nothing, This is all about him." So after calming down about the situation, I went to bed, and the next day, arrived at the office to find a "Dear John" letter in my email. Basically stating that he wanted to move out because It wasnt fair to me because I didnt want the dog inside, and wasnt fair to the dog because he was in the mud. Well, Good luck with that buddy. So I know, this was Toms way of avoiding any kind of confrontation or situation that would have arisen. Personally I couldn't see the situation getting out of control, but who knows.

So, I talked to a good friend that night, who usually calls me out on my thinking patterns/errors. I was really upset and agitated at him because I told him that I planned on "letting go" of the situation. He pointed out to me (much to my chagrin), that I way too often let people take advantage of me. And I was thinking to myself, "What the hell is this guy talking about? I dont let people take advantage of me!" Well, less than 24 hours later, this statement would fufill itself.

To be continued.....

Thursday, May 21, 2009

Ford Five Hundred Cabin filter

So my biggest complaint about the new to me ride is, the lack of a cabin filter. I work in the dust bowl. There is a daily smattering of ultra fine dust on my car every day when I leave the office.

How much of this dust is SUCKED into the car and into my lungs? Surely, Ford has decided to put a cabin filter in their newest sedan in their model line up. Nope.

Not only is air quality of concern, but its unhealthy for the AC system. Dust on the blower motor and evaporator core wreak havoc on the system.

However, they did have a cutout for where one SHOULD be.

So I checked around. The 2008 Taurus which has a cabin filter, uses a popular number, that many cars, including Acuras use. So I went out, picked up a cabin filter, and armed with my dremel and a fine toothed hacksaw, I went to work.

This mod is applicable to the 05-07 Ford Five Hundred, Ford Freestyle, and Mercury Montego. I am not responsible for you destroying your evap case due to poor decision making on your part.

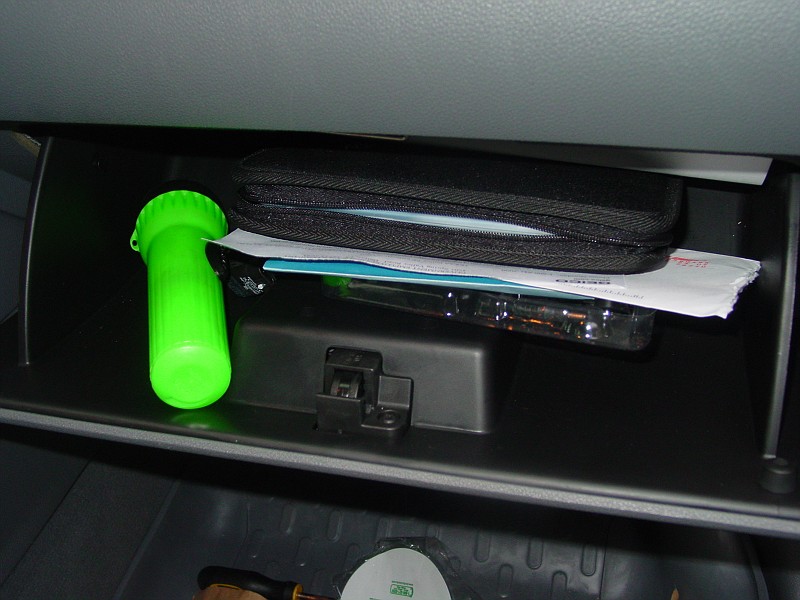
You'll need to to get all your junk out of the glove box.


Next, you want to pull up on the button as shown here.


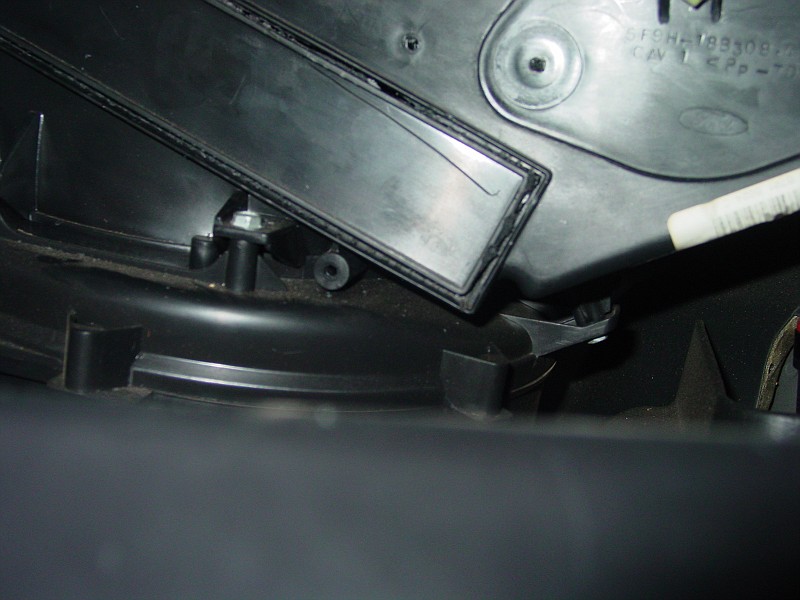
Now you have access to the evap case.

Notice Ford had made provisions for Cabin filter access cutout in the blower box.

You'll want to cut between the 2 ridges. All the way around. Dont worry about being perfect. Keep it between the ridges, youll be fine. Dont throw the piece you cut out away.


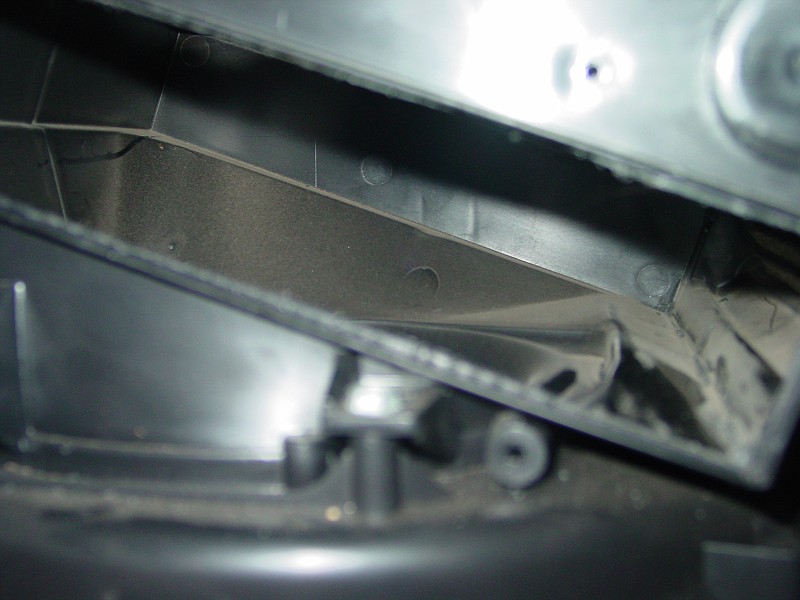
Now heres the cutout removed. Notice that Ford had every intention of having a filter here. Square opening, flat floor ridges, etc. Also notice the amount of dust in there. Blech. Windex and paper towel time.


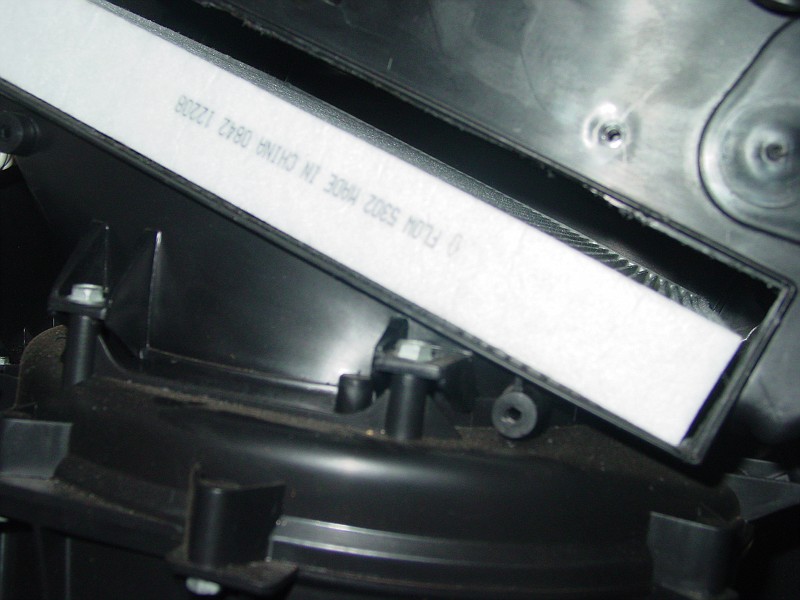
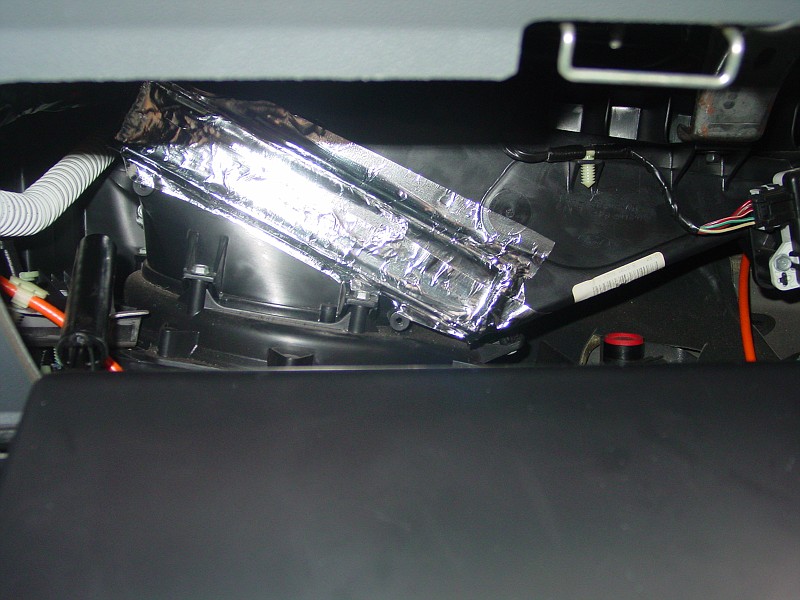
So heres our new cabin filter installed.


Now heres the piece we cut out, back in place, and some Aluminum tape, holding it all in. Not the prettiest, but functional.


Now I can enjoy clean filtered air! Most manufacturers recommend annual replacement, so I'll check in a year from now and we'll take a look at that filter!

Tuesday, May 5, 2009

Flat tire fun

So I get a call yesterday from a guy in the office. "Hey I think you got a flat tire."

I go out there, and sure enough, its leaking air, going flat but not completely yet.
First time I've had a flat in 10 years.

Scrambling around, I ask a few people if they have an air compressor. I usually carry one, but because I autocrossed this weekend, I took it out.

One friend and coworker of mine had a compressor. At 5:30 I go out and start to air it up. The tire doesnt seem to be responding. My friend came out and looked under the car. There was a screw, and it had punctured completely through the sidewall, and out the other side!! Had I aired it up earlier in the day. I might have gotten away with getting only one puncture. Oh well. My fault.

So I had to put the donut on. Those of you that know me, know that I cannot STAND temporary spares. I already have a spare full size rim for the car, I just havent gotten around to putting a tire on that rim yet.

I get home and decide to plug both holes (DO NOT do this). They seemed to hold air, but when I got up this morning, the tire was flat again.

Time to go get some new tires!

From Tire


From Tire

Tuesday, April 14, 2009

Garage Door Opener Issues

Well, as most things go with time, they tend to fail. One case is my Craftsman garage door opener.

Its been getting noisy over time but I didn't realize how much until it completely failed Monday morning. If I didn't look in the rearview mirror and saw darkness. Got out and I hear the motor running, but the door had only moved about 3".

Well, looks like I have problems, but I'm on the way to work, so lets open and close manually and have a look later.

Well, this is what I found when I got home.


The gear that is driven by the worm gear has eaten itself alive. Upon further research, this gear needs to be lubricated regularly, which it obviously has not been. I've lived here almost 4 years and I've only greased the rollers and lubed the chain.

So off to Sears service center I go. Well, guess what, Sears cannot help unless you have the model and serial number. This happened to me about 12 years ago at this same place. Why should it be different now? I get online on ebay, theres a seller there that has the gears. I call his #. He asks "Do you have the optical eye at the bottom of the door?" yes, I do. Then tells me "its the same gear from 1984 to today". Why can't sears figure that out?


I ordered the kit, it arrived in 3 days. My next post will illustrate replacement and chain adjustment.

Thursday, March 19, 2009

Forgot to Remind all you readers! (DST Time again!)

Once again, we have DST!
This is a good time to remember other things that need to be taken care of, specifically on your car, and at your home!

I like to remind folks that really aren't into car care, that at least twice a year, (a good reminder is around the time change) you should:
  • Change the oil (more than 2x per year but if you can't remember do it now)
  • Rotate your tires, correct air pressure
  • Inspect/Replace your air filter
  • Wash the car really well (including the wheel wells and rails/drains).
  • Remove the garbage inside the car
  • Inspect all your exterior lights

House:
  • Fertilize the lawn (Fall Fertilizer, and Spring Time too)
  • Change the Ice maker Filter
  • Change the A/C Furnace Filter
  • Open the windows and let some fresh air in!
  • Drain that hot water heater
  • Check/Replace any light bulbs that burned out

Friday, November 21, 2008

Free Parking?


Well, Network Geek finally has his entire driveway back!

A little history....

In 2005, I bought NG's old car, which had been sitting idle for a while, with the intention of fixing and selling. Fast forward to November 2008, NG is having a get together at his house on turkey day, and I owe him a Entertainment center that I promised him from March of this year. I decided to stop procrastinating and bring him the stand, and when I went over there, I saw the car, sitting with layers of grime and dust, lookin kinda sad. Thats when I finally decided, well, 3 years of free parking and no efforts to get that thing running, NG's trying to get his house cleaned up for Turkey day, so I'll help the effort by removing 2 tons of steel off his property.....
So off she goes to the world of Craigslist. And what do you know, within 1 hour of posting, a guy from 2 hours north of here is coming to get her! To top that off, the new buyer found a set of wrenches that I had bought and left in the car back in 2005. I always wondered where those things went off to! ;)

He arrived an hour before he said he'd be there, loaded the car and paid up, and left! Thanks again NG for the free parking for the last 3 years!

I've actually been paring my fleet down little by little, so much to the point that I'm getting a little nervous about how many vehicles I'm down to! I'm sure this will be a temporary situation of course!

Tuesday, November 18, 2008

2nd Gen Lexus GS300 Valve Cover Gaskets

Heres another technical post for you car nuts out there. This past weekend, I replaced Valve cover gaskets on my friends 2nd Gen Lexus GS300.

"Gasket(s)?" You ask? On a GS300? Isnt that an inline 6? Why yes, yes it is. But Lexus has separate valve covers. One for Intake Side, and one for the exhaust side. So I went ahead and ordered the gasket set from Oreilly Auto Parts, which carries Fel-Pro.

For this project you'll need:

-Standard set of tools, specifically allen wrenches, 8,10,11, 12 mm sockets, a ratchet
-in-lb torque wrench
-Gasket Set
-RTV Sealant
-Brake Cleaner/Carb Cleaner
-Rags

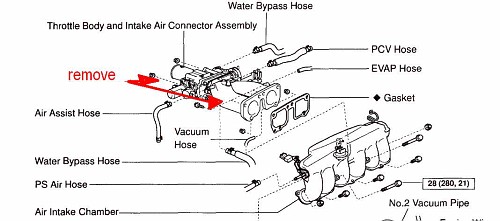
Here you'll see the view of the intake assembly. The intake tube, throttle body and "Y Pipe" all have to come off, but you have to take each piece off, remembering to mark Vacuum hoses and electrical plugs if you can't remember where they go. Note the water bypass hose. Remember to put the clamp back on when you slide the hose back. The "Air intake chamber" Does not have to be removed to do this job.


Now that you have all that out of the way, you have easy access to both valve covers. You may have to unplug some of the ignition coils or the spark plug wires. BE VERY CAREFUL: these plugs are brittle from heat cycles and could crumble!!

This is also a good time to replace the plugs if you haven't done so in a while. I like NGK or Denso Plugs in Japanese cars.


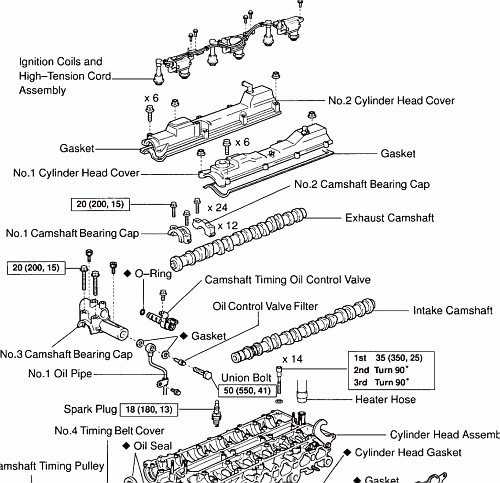
Remove both valve covers and use the cleaner and a rag to clean the mounting surfaces of the cylinder head, paying attention to the front of the cam where the RTV sealant is.

Next, remove the old valve cover gaskets. This car has 180,000 miles on it, and the gaskets were hard and brittle and were no longer doing their job. Clean the seating area of the valve covers well and if you like, apply a gasket sealant to the inside of the valve cover where the gakset rides, and insert the new gaskets.

Go back to the car and apply some RTV sealant where the cams ride near the timing chain to help promote a good seal. Let this set a few minutes (10-15 in warm weather).

Now, we're ready to put the covers back with the new gaskets. Sit the cover on the cylinder head and replace all the bolts and 2 nuts, finger tightening each one and then using the in-lb torque wrench to snug to 95 in-lb. Start from the center and criss cross the bolts all until snug at 95 in-lb.

Now, throw it all back together. The Y Pipe has two very small vacuum lines and a larger one on the firewall side. Dont forget about them. Reinstall the Throttle body and the coolant line, make sure you put the clamp back.

Now for the intake tube. Plug all the electrical connections back in and you're ready to go!

Start the car and check for leaks.

Friday, March 28, 2008

Kia Sorento Crank Sensor

If you're reading this post, more than likely you're either a car nut like me, or you've searched the net to come upon my site to figure out why your Kia Sorento SUV is acting up.

My neighbors, have a 03 Sorento with 99K miles. It died on them mysteriously the other day, and they had it towed home. The car starts and runs but you rev it and the check engine light comes on and it dies.

Well, I scanned it and it comes up with a Crank Sensor Fault. Heres the problem, the crank sensor access requires timing cover removal....which requires FEAD removal. This project is not for the faint of mechanicals but can be done in around 5 hours if you have air tools. This would also be a good time to replace your FEAD belts (3 of them) and inspect your timing belt. My neighbors had the belt replaced at 60, so we wont touch them.

The sensor is a Borg Warner CSS1002, and is available at Pep Boys for around 130 bucks. Its a simple operation, take everything off, and put it all back together.

What about the 10 year, 100k warranty, you ask? Read the fine print. The warranty is a bare bones deal, covers the block, crank, and certain hard parts. Nothing like sensors and other stuff that tends to fail with heat soak. So, what happens if you end up not having a neighbor like me? Your first instant reaction would be "Oh I have a warranty", and have it towed in, and then letting the dealer tear it down, and then tell you its not under warranty. I asked my neighbor to call and ask what it costs to do the repair at the dealer. HE was quoted "Around 750 dollars" OUCH!

Tuesday, March 11, 2008

Used Oil Analysis....More Car fun...

Some people may think I take the car maintenance thing a little too far sometimes. Well perhaps I do.

On my diesel Mercedes, I run 12,000 miles between oil changes. Yes thats right, twelve thousand. I do change the filter and top the oil off every 3,000, and at 6,000 and when I change it, I send a sample in to Blackstone Labs for a UOA or "Used Oil Analysis". Theres two reasons I do this.

  1. I want to know whats going on with my car. I'm approaching 280,000 miles quickly and its nice to know whats going on inside. Kind of like bloodwork.
  2. I use Synthetic Oil, which is costlier but one of the key benefits I like is better protection and extended drain intervals (or so they claim)
  3. Extended Drain intervals means less impact on the environment, even if you do recycle the oil.
I'm not a big environmentalist or anything dont get me wrong, but there's no reason to pollute more than I need to.

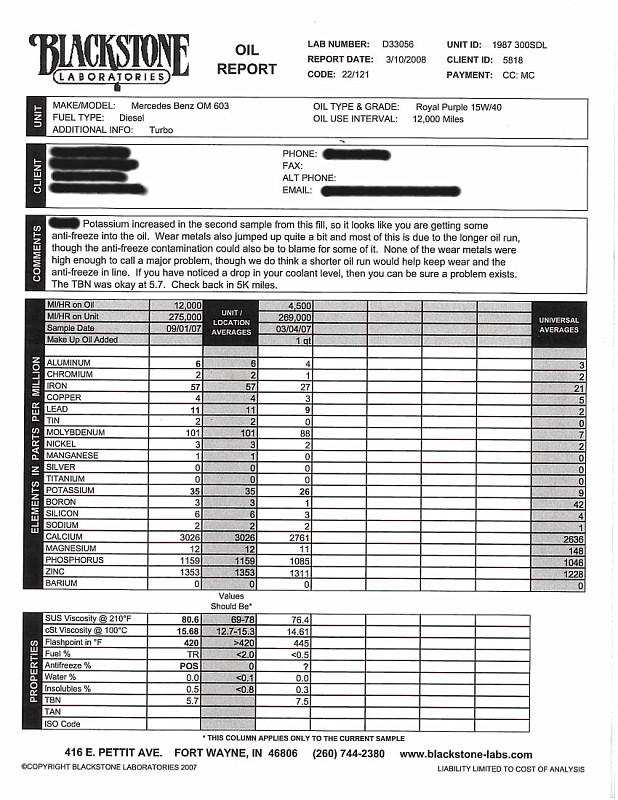
So the last UOA report I just got in, shows that wear materials are high, and potassium is high. I spoke with a guy at the lab and he explained that just changing the filter isn't going to remove the amount of wear materials (iron copper etc) from the oil, and most certainly not coolant. Now if I had a bypass filter on this car, then I would be fine for thousands of miles more, but how far are we going to take this on a car fast approaching 300,000 miles?

Anyway, heres a link to the report.

I think the plan here is to change the oil at 5,000 this time and send a sample in again to see whats going on. The odd thing is, I'm not losing any coolant. Go figure.

Wednesday, January 9, 2008

Things to take care of in the new year....

Okay guys, I used to really be psycho about changing my furnace/Air Conditioning filter, but I, myself am guilty of letting this one slip. After doing some renovations of the house this weekend, I looked at my thermostat and saw the sticker I had placed on there called for a filter replacement in April 23, 2007. Meaning the last time I changed the filter was Jan 23, 2007!! Wondering why your house doesnt stay warm/cool, or why your light bill is high? I'm sitting here with the 'fan' mode on right now, I can feel the airflow again in bed!! WOW.

I use 3M Filtrete purple filters, which is the 2nd best they make, and they claim its good for up to 3 months. I guess after a year is quite a bit. I can't believe I let it slip this long!!!

Okay, here a pic....Click for the full size....BLECH!


Another thing for you guys that don't stay on top of these things. Lets do this in January!
1. Change your A/C or Furnace Filter in your home
2. Change your water filter in your icemaker if you have one
3. Drain that hot water heater! Prevents the banging and clanging of Calcium Deposits!
4. Clean those gutters!
Any more tips? I'm sure there are a zillion things to do when you're a homeowner, these are some major things that I think off the top of my head... Post em here!

Annual Car tips.....
1. Rotate your tires (do this 2X per year at least!) on your car and check your air pressure (monthly) don't forget that spare tire!
1a. If you're my friend RC, this would be your ANNUAL oil change! Thank goodness your wife takes care of you!
2. Change your Car's Air Filter. This can be done in less than 5 minutes. If you have a newer car, you may have a Cabin Filter. Time to swap that out too! Makes the bad smells in your car go away!
3. Wash your car, not at the car wash. Do this at home. This would be a good time to clean out the insides of your wheel wells, rinse away all that salt, sand, and dirt that will breed rust all in your car!

Thursday, November 22, 2007

Happy Turkey Day!

Well Everyone, another Thanksgiving is among us! And I woke this morning to...*Gasp*

COLD WEATHER! WOOHOO!!!!

I love it! Cold Thanksgivings are great! Time to get up! I'm going to Chris and Bethanys this morning to work on Chris's Truck and then coming home to make mashed taters!

Going to my moms to celebrate with around 30 people! WOOHOO!
Happy Turkey Day All!

Tuesday, November 13, 2007

My first technical post

Well, my 02 Ford Explorer has developed a Clicking noise from the rear AC blower area, so much that when people ride in the 2nd row, they ask "is something wrong with your car?"

So I know that one of Fords electronic actuators is out, so, time to do some exploratory surgery and see whats knocking in the back!

Do this on a Cold Motor, because there are heater hoses running to the back and you could injure yourself on the hot hoses.
  1. First off, You'll need:
  • A Socket Set, Metric 3/8 and 1/4" drives with various extensions. Specifically, 13mm deep, 10mm and 8mm.
  • A trim removal tool
  • A dropcloth or sheet to keep the interior of your truck clean
  • T50 Torx Driver
Now, Lets move on. This repair applies to all 02-07 Ford Explorers with Rear AC. If you mysteriously have some clicking or knocking from the rear cargo area of the truck, when the ignition is on or if the AC is running, this is probably your issue. I was getting the noise ANY time the ignition was switched on, whether the HVAC system was running or not.

So here's our 2002 Ford Explorer. Start by Putting down the rear seat if equipped and removing any cargo tray liners, tools, junk etc from the rear of the truck.

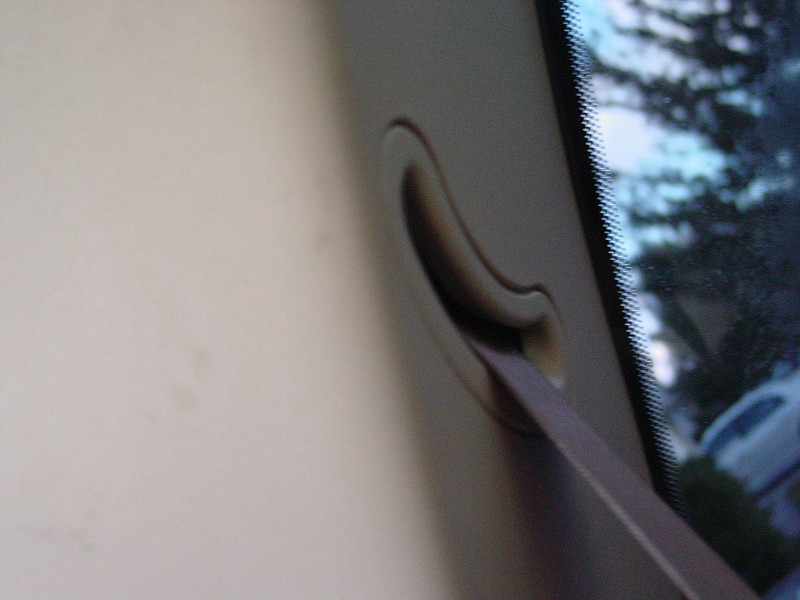
First, remove the upper and lower trim from around the cargo area. This can be achieved by using your fingers to gently pry out the panels or you can use the trim removal tool to help.

Next, if equipped, pull the 3rd row Seat Belt "D" ring out of the panel


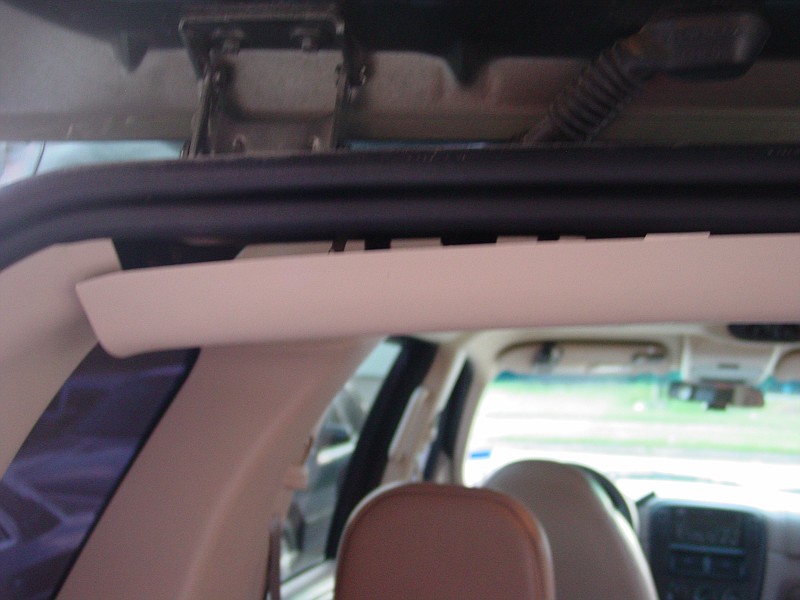
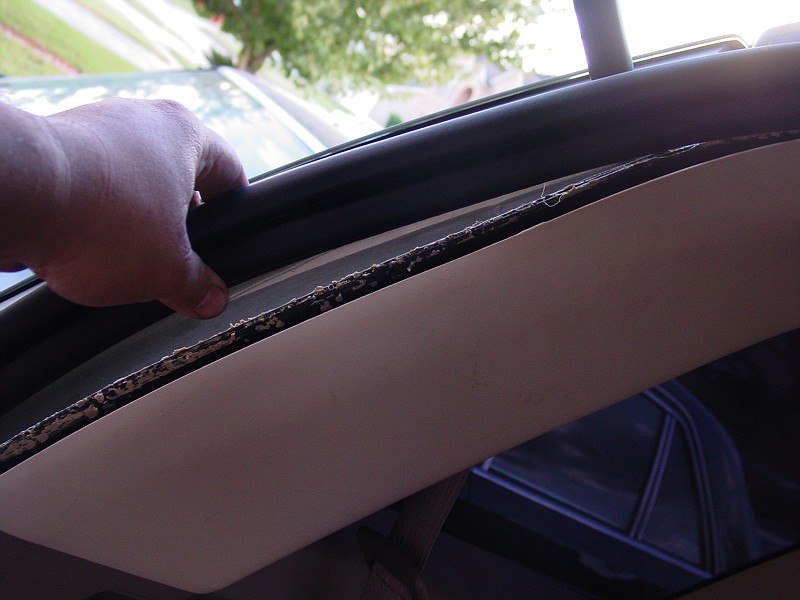
Now that the D Ring is out of the way, pull the rear hatch weather stripping out of the way and remove the Upper Side trim panel. Use your trim removal tool to help in getting the panel loose. Gently pry AT the clips and pull out. Once one side is loose, pull at the clips, not at the whole panel.


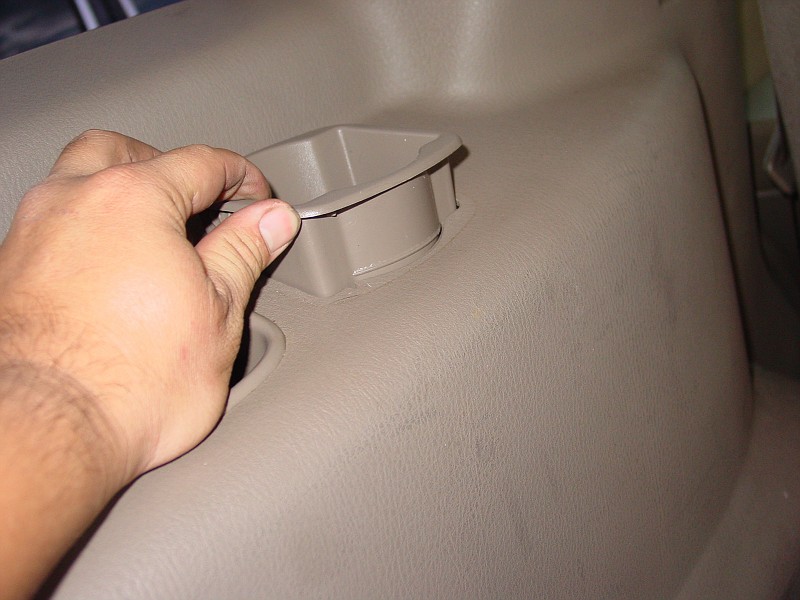
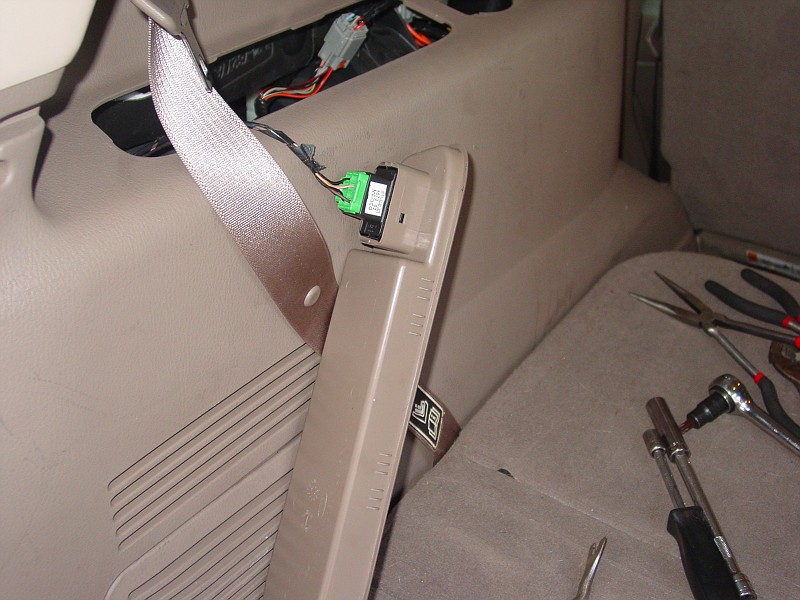
Now that the panel is exposed, we can remove the cupholder and the power lock panel, disconnect the wiring harness to the switch. Use the trim tool to help avoid scratching your interior.


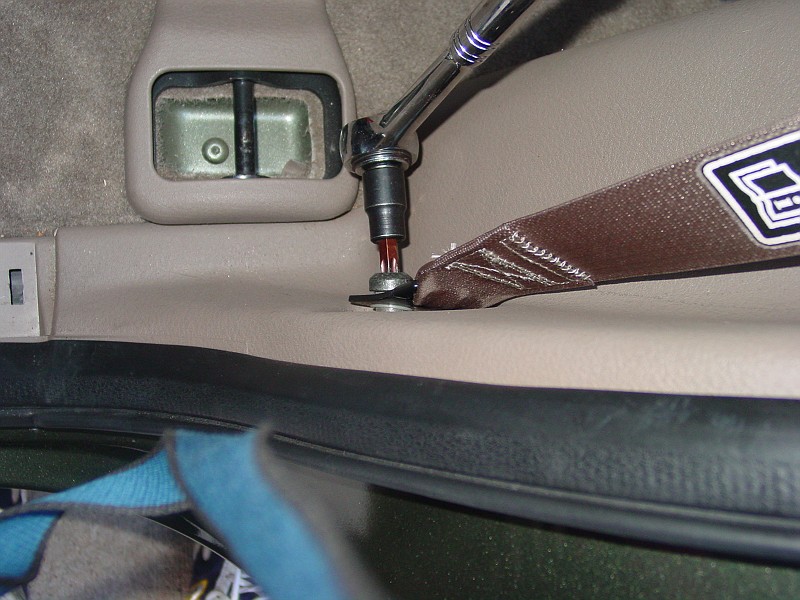
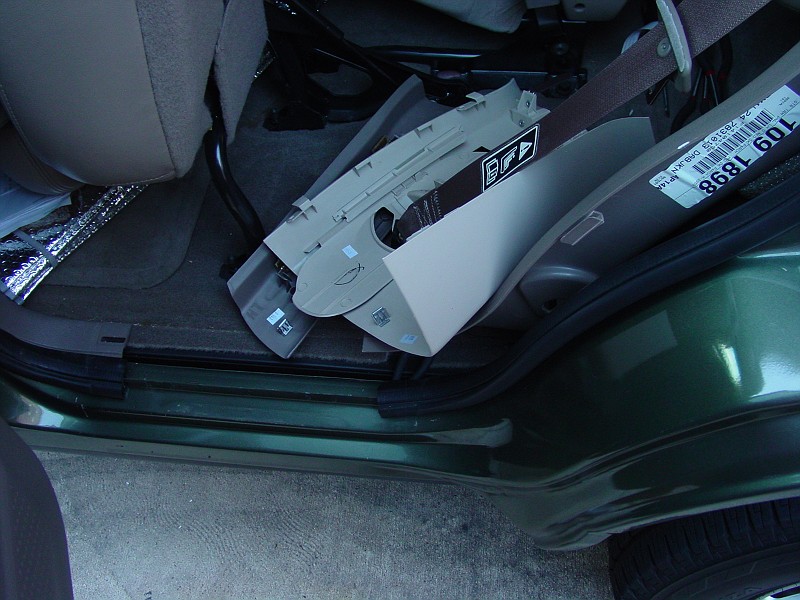
Now that we have this panel removed you're going to need to get to the driver side rear door and remove the upper trim piece, lower scuff plate and lower seat belt anchor. The upper trim panel is VERY tricky. Be gentle and take your time.


Now that the scuff plate and upper panel is removed, pull outwards on the lower panel from the front, and then go to the rear, pull out again, near the clips, use your trim tool to help.


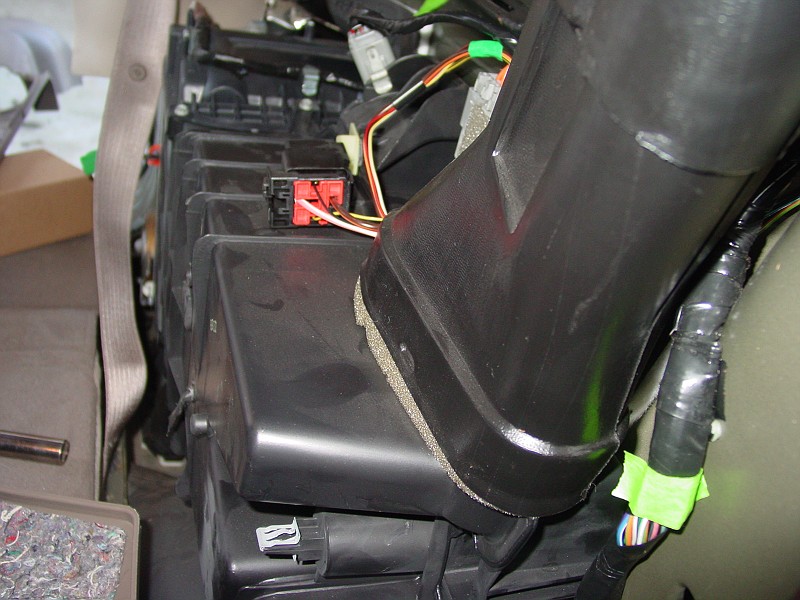
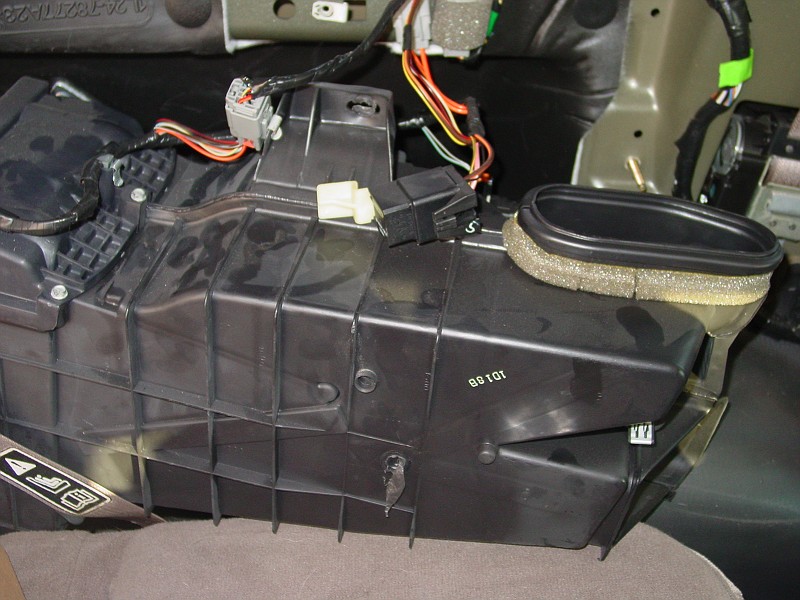
Now move to the back. This duct can be pushed up into the upper duct so you can remove the blower box.

Now, you can remove the upper 10mm bolt on the blower housing


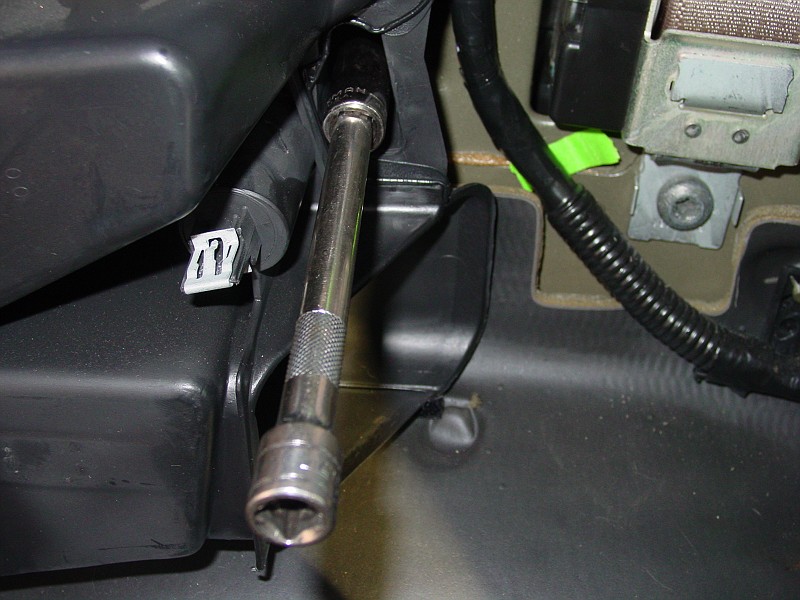
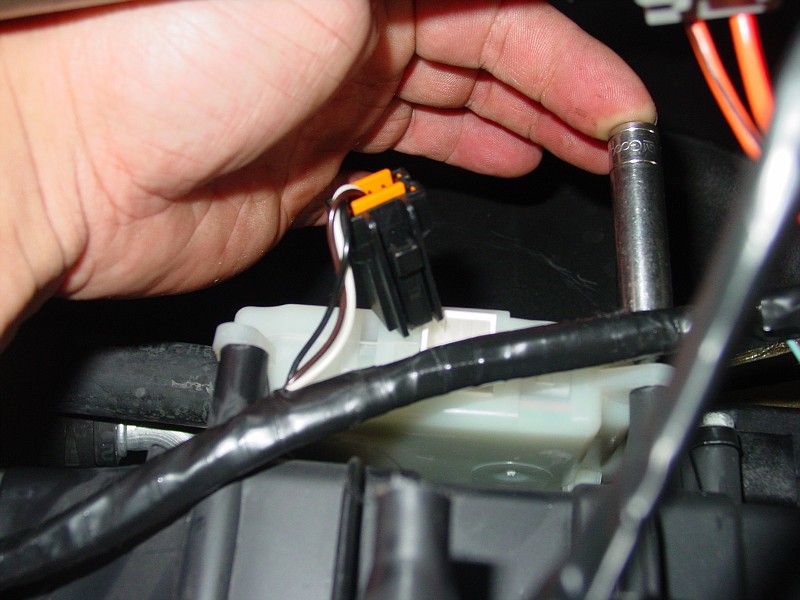
Now loosen the lower bolt near the driver side rear door, 13 mm. You'll need a deep well 13 mm to access this.

Now we can move the blower box out to see whats going on in the back. VERY CAREFULLY slide the box from the long stud and turn the ignition switch on and the AC Fan to isolate the clicking noise.

After turning the key on, I found that the noise is coming from the temperature blend actuator. I unplugged it and the noise went away. Now you have isolated the culprit, turn the key off and replacement of the actuator can begin. I used a 8mm socket and 1/4" drive ratchet to remove the culprit. There are 3 screws on this one.
Heres the new part. It's a dealer item only, and cost around 60 bucks.


Now we can put the new part in, plug it in and turn the key and listen for the sound of....silence! Once you have verified the part is in and working and its quiet, reassemble and pat yourself on the back for saving 2.5 hrs at a dealer rate of 70-100 dollars!