"Gasket(s)?" You ask? On a GS300? Isnt that an inline 6? Why yes, yes it is. But Lexus has separate valve covers. One for Intake Side, and one for the exhaust side. So I went ahead and ordered the gasket set from Oreilly Auto Parts, which carries Fel-Pro.
For this project you'll need:
-Standard set of tools, specifically allen wrenches, 8,10,11, 12 mm sockets, a ratchet
-in-lb torque wrench
-Gasket Set
-RTV Sealant
-Brake Cleaner/Carb Cleaner
-Rags
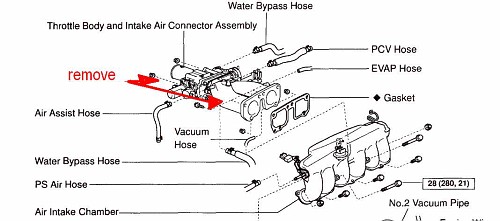
Here you'll see the view of the intake assembly. The intake tube, throttle body and "Y Pipe" all have to come off, but you have to take each piece off, remembering to mark Vacuum hoses and electrical plugs if you can't remember where they go. Note the water bypass hose. Remember to put the clamp back on when you slide the hose back. The "Air intake chamber" Does not have to be removed to do this job.
Now that you have all that out of the way, you have easy access to both valve covers. You may have to unplug some of the ignition coils or the spark plug wires. BE VERY CAREFUL: these plugs are brittle from heat cycles and could crumble!!
This is also a good time to replace the plugs if you haven't done so in a while. I like NGK or Denso Plugs in Japanese cars.
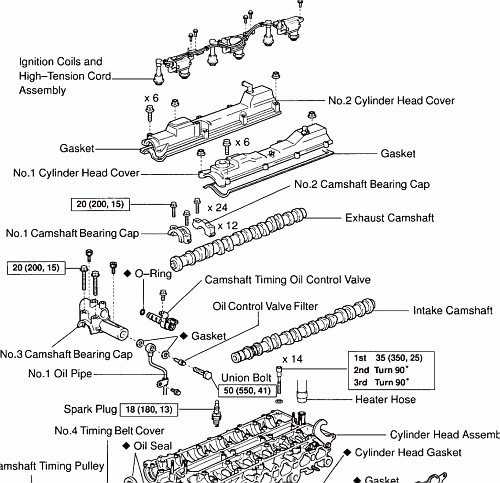
Remove both valve covers and use the cleaner and a rag to clean the mounting surfaces of the cylinder head, paying attention to the front of the cam where the RTV sealant is.
Next, remove the old valve cover gaskets. This car has 180,000 miles on it, and the gaskets were hard and brittle and were no longer doing their job. Clean the seating area of the valve covers well and if you like, apply a gasket sealant to the inside of the valve cover where the gakset rides, and insert the new gaskets.
Go back to the car and apply some RTV sealant where the cams ride near the timing chain to help promote a good seal. Let this set a few minutes (10-15 in warm weather).
Now, we're ready to put the covers back with the new gaskets. Sit the cover on the cylinder head and replace all the bolts and 2 nuts, finger tightening each one and then using the in-lb torque wrench to snug to 95 in-lb. Start from the center and criss cross the bolts all until snug at 95 in-lb.
Now, throw it all back together. The Y Pipe has two very small vacuum lines and a larger one on the firewall side. Dont forget about them. Reinstall the Throttle body and the coolant line, make sure you put the clamp back.
Now for the intake tube. Plug all the electrical connections back in and you're ready to go!
Start the car and check for leaks.
2 comments:
Hi,
Any chance of getting the pics up again?
Thnaks!
Hi,
Any chance of getting the pics up again?
Thnaks!
Post a Comment